Introduction
IDA Pro is one of the most powerful static analysis tools, while Qiling is a modern and advanced dynamic analysis tool. To combine the advantages of both tools, we hereby present the Qiling IDA plugin, which enhances the experience of reverse engineering to another level.
The main features of the plugin are:
- Support most architectures & system emulation and work without any virtualization technology
- Emulate current binary in IDA
- View real-time emulation context in standalone windows
- Custom user scripts to control the emulation
- Save and load snapshots of emulation context
- Deobfuscate code
Quick overview, a video demo on how to use Qiling IDA plugin to decrypting Mirai's secret:

Installation
Before installing the plugin, Qiling should be installed properly. For now, installing from the "dev" branch of Qiling's repo is highly recommended.
pip3 install --user https://github.com/qilingframework/qiling/archive/dev.zip
There are two ways to install the plugin
i. Use as an IDA Pro plugin
Make a symbol link to IDA Pro plugins directory.
Note
In case your installation location is different (due to different installion methods), replace these paths with proper paths.
# Linux
ln -s ~/.local/lib/<python version>/site-packages/qiling/extensions/idaplugin/qilingida.py /path/to/your/ida/plugins/

# Macos
ln -s /usr/local/lib/<python version>/site-packages/qiling/extensions/idaplugin/qilingida.py /Applications/<Your IDA>/ida.app/Contents/MacOS/plugins/

# Windows
mklink C:\absolute\path\to\IDA\plugins\qilingida.py C:\Users\<username>\AppData\Roaming\Python\<python version>\site-packages\qiling\extensions\idaplugin\qilingida.py
Copying qilingida.py from dev branch to IDA Pro's plugin folder will work, too. Considering the development of Qiling is always on the fast ring, symbol link can save lots of tedious copy-and-paste work.
ii. Use as a script file
Start IDA Pro, click File/Script file... from the menu, choose the location of qilingida.py and the plugin will be loaded automatically.
Once loaded, the plugin is available under "Edit->Plugins->Qiling Emulator" and pop-up menu.
The plugin supports IDA Pro 7.x with Python3.6+.
Recommend platforms: macOS & Linux.
Warning
When trying to use IDA Pro with Python3.8, IDA crashes. The cause and solution of the problem
Emulation Support
Most emulation is supported natively by Qiling Framework. Below is a table for details.
| 8086 | x86 | x86-64 | ARM | ARM64 | MIPS | |
|---|---|---|---|---|---|---|
| Windows (PE) | - | ☑ | ☑ | - | ☐ | - |
| Linux (ELF) | - | ☑ | ☑ | ☑ | ☑ | ☑ |
| MacOS (MachO) | - | ☐ | ☑ | - | ☐ | - |
| BSD (ELF) | - | ☐ | ☑ | ☐ | ☐ | ☐ |
| UEFI | - | ☑ | ☑ | - | - | - |
| DOS (COM) | ☑ | - | - | - | - | - |
| MBR | ☑ | - | - | - | - | - |
- - : Not apply.
- ☐: Not supported.
- ☑: Support.
Setup, Load, Emulate & Debug
Setup
To emulate current binary in IDA Pro with Qiling, two things are supposed to be provided: rootfs and custom user script.
rootfs is the root directory of the emulated environment. Usually, the /path/to/qiling/examples/rootfs/<arch> directory should work for most cases. custom user script provides some custom callbacks before emulating the binary, continuing, or single-stepping. A good example can be found here.
To setup the plugin, right-click anywhere and choose the submenu Qiling Emulator from the pop-up menu.
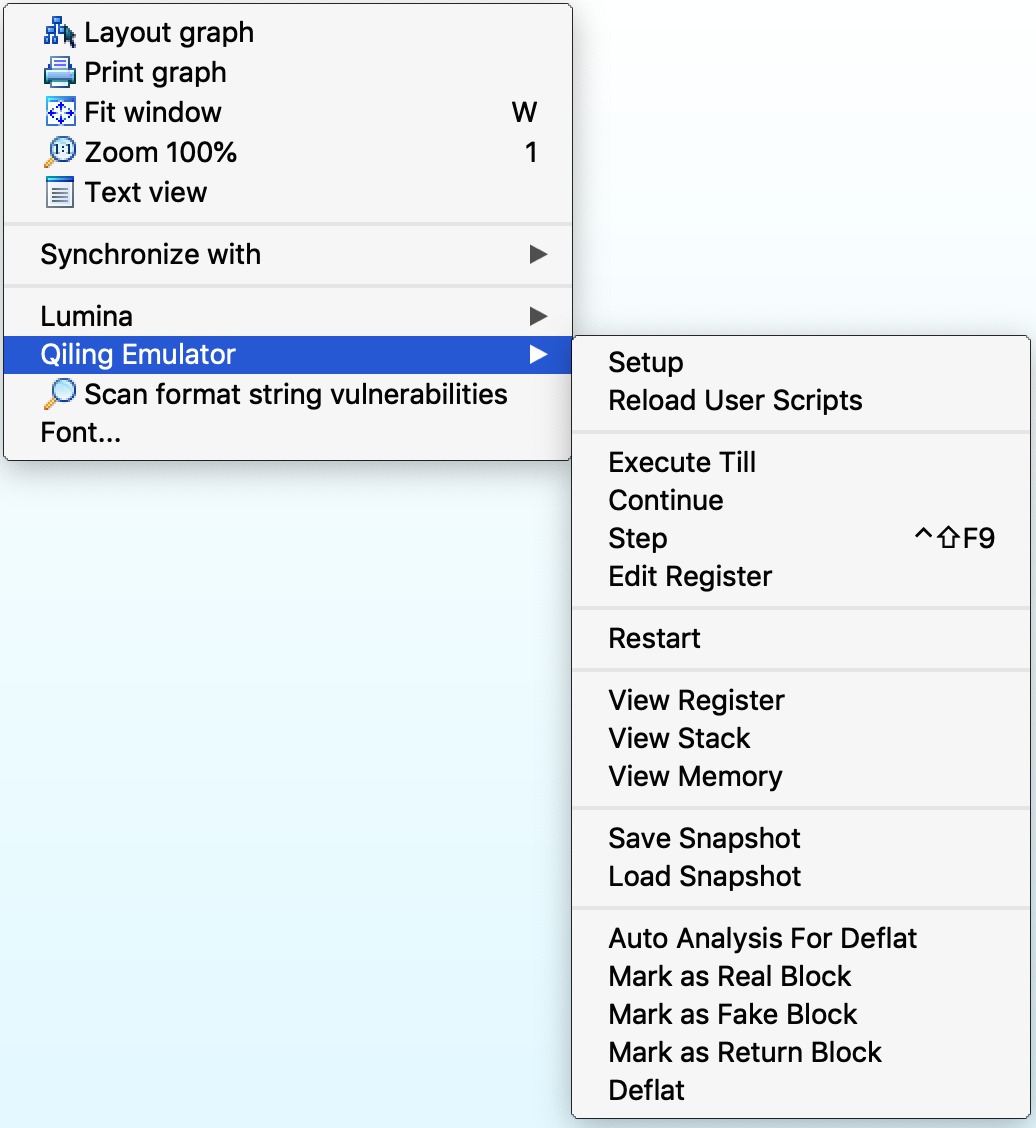
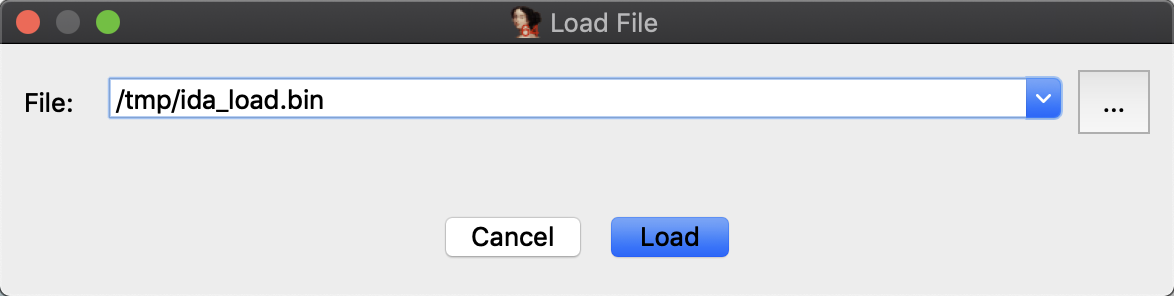
Select Setup from the menu, pop-up window will appear and ask for rootfs, custom user script and an optional parameter env
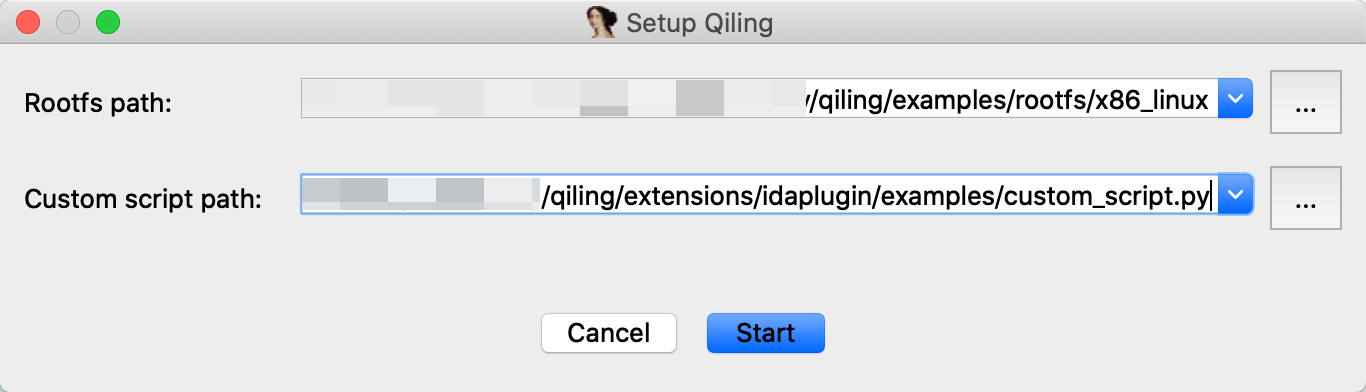
A successful load will print "Qiling is initialized successfully" in the output window below. Otherwise, "[ERROR]: Qiling should be setup firstly." will show up in the output window instead.

Load and emulate
At this time, Qiling has finished parsing the binary, loading it into the memory, setting the PC to the entry point, and preparing everything ready for the following emulation. Thus, user only needs to click Continue in the menu and Qiling will run the target binary from the entry point to the end. At the same time, Qiling IDA plugin will render the executed path to green for later analysis.
To restart the emulation, select Restart in the menu and fill in the rootfs and custom user script again.
Debug
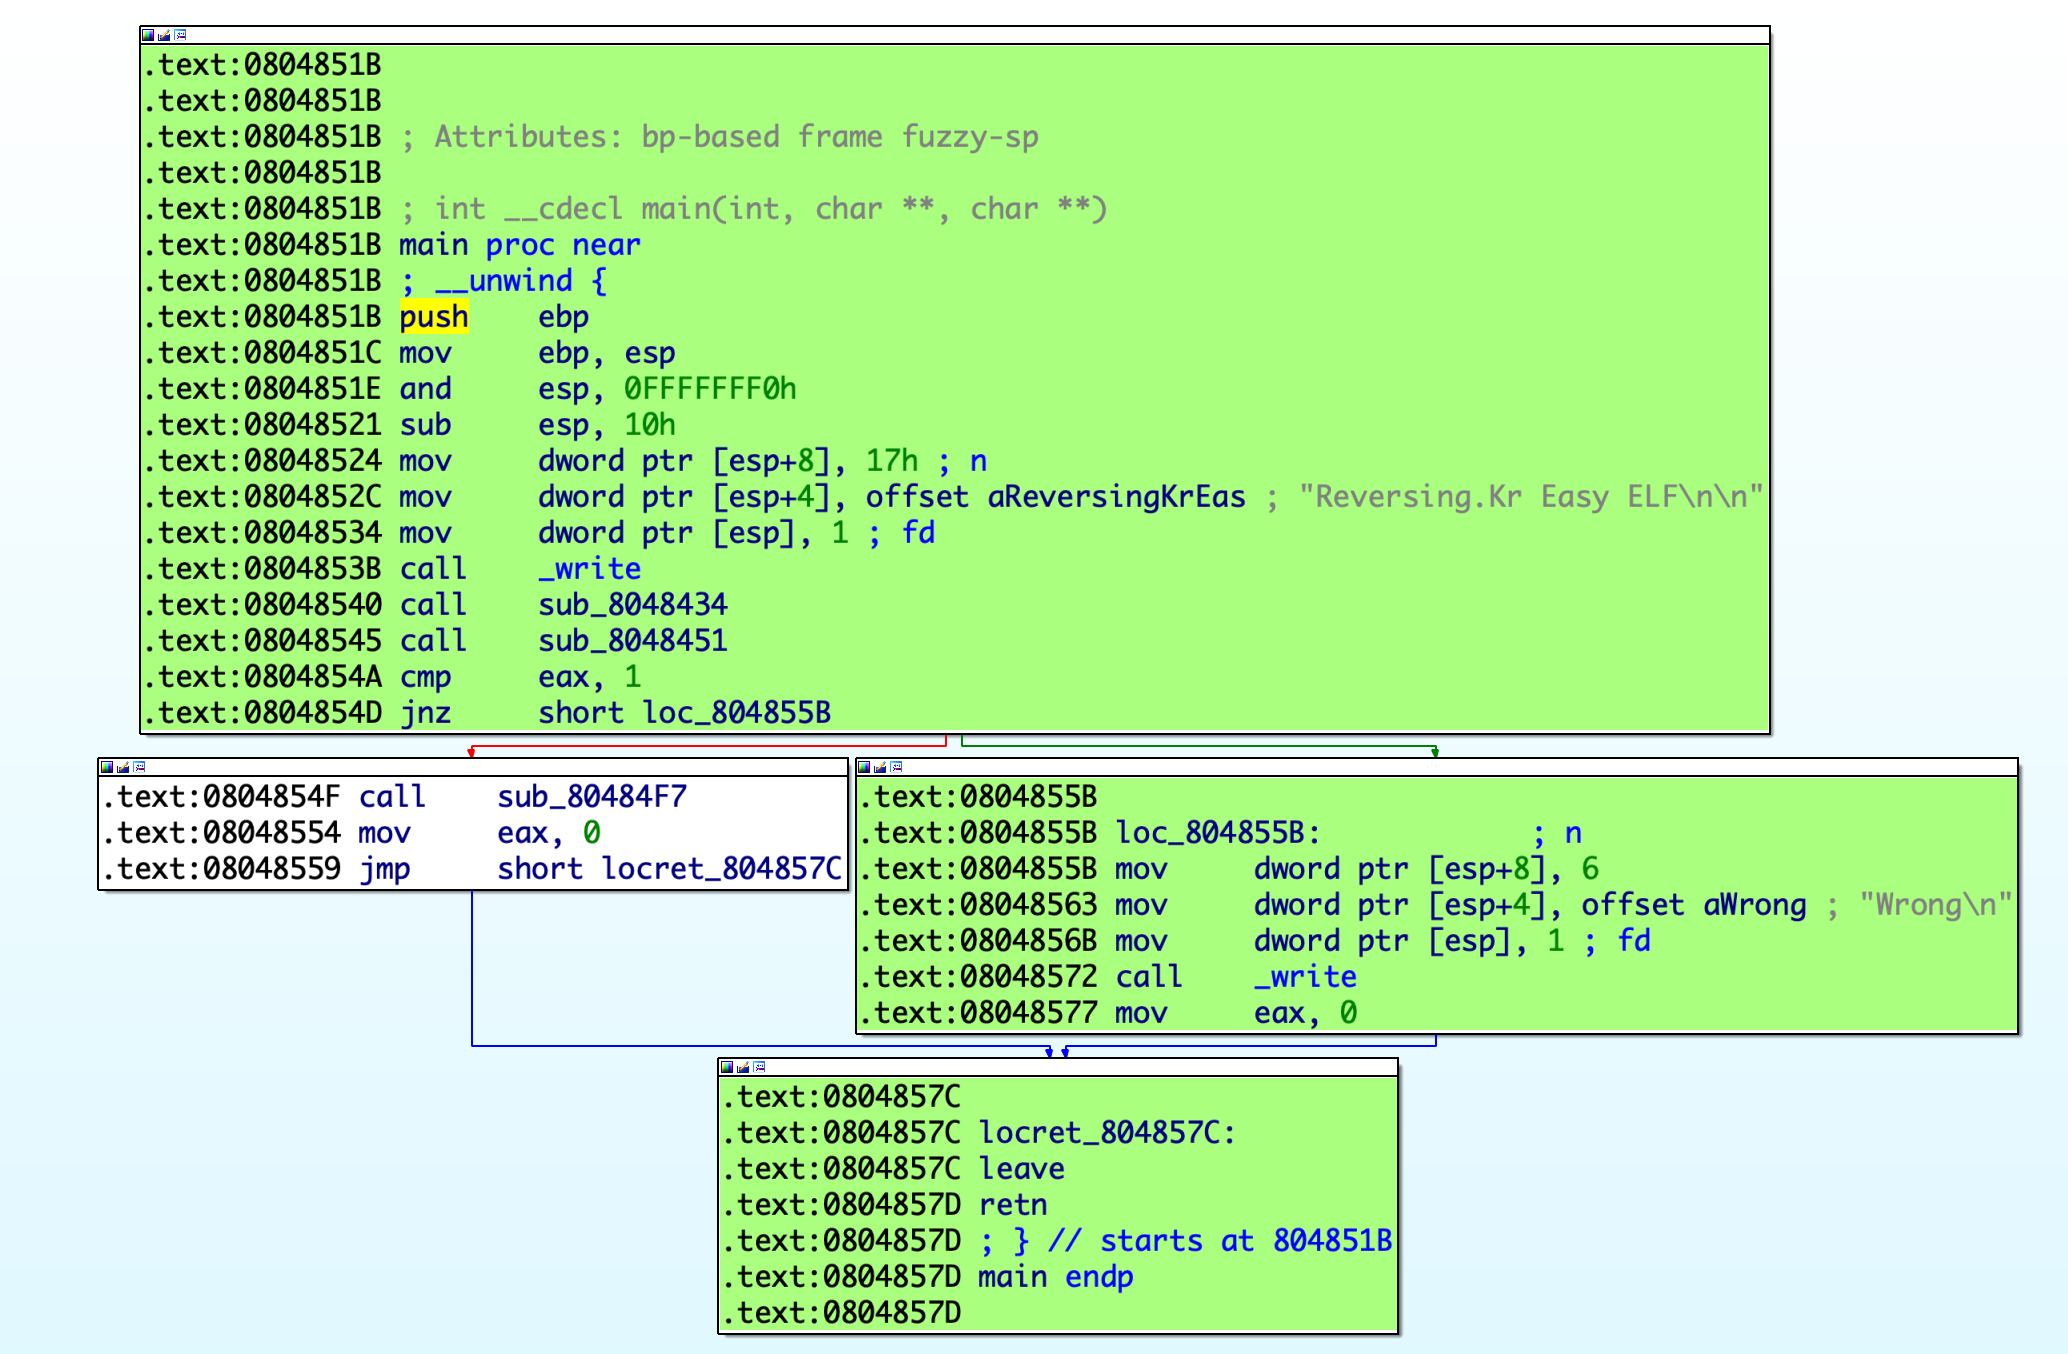
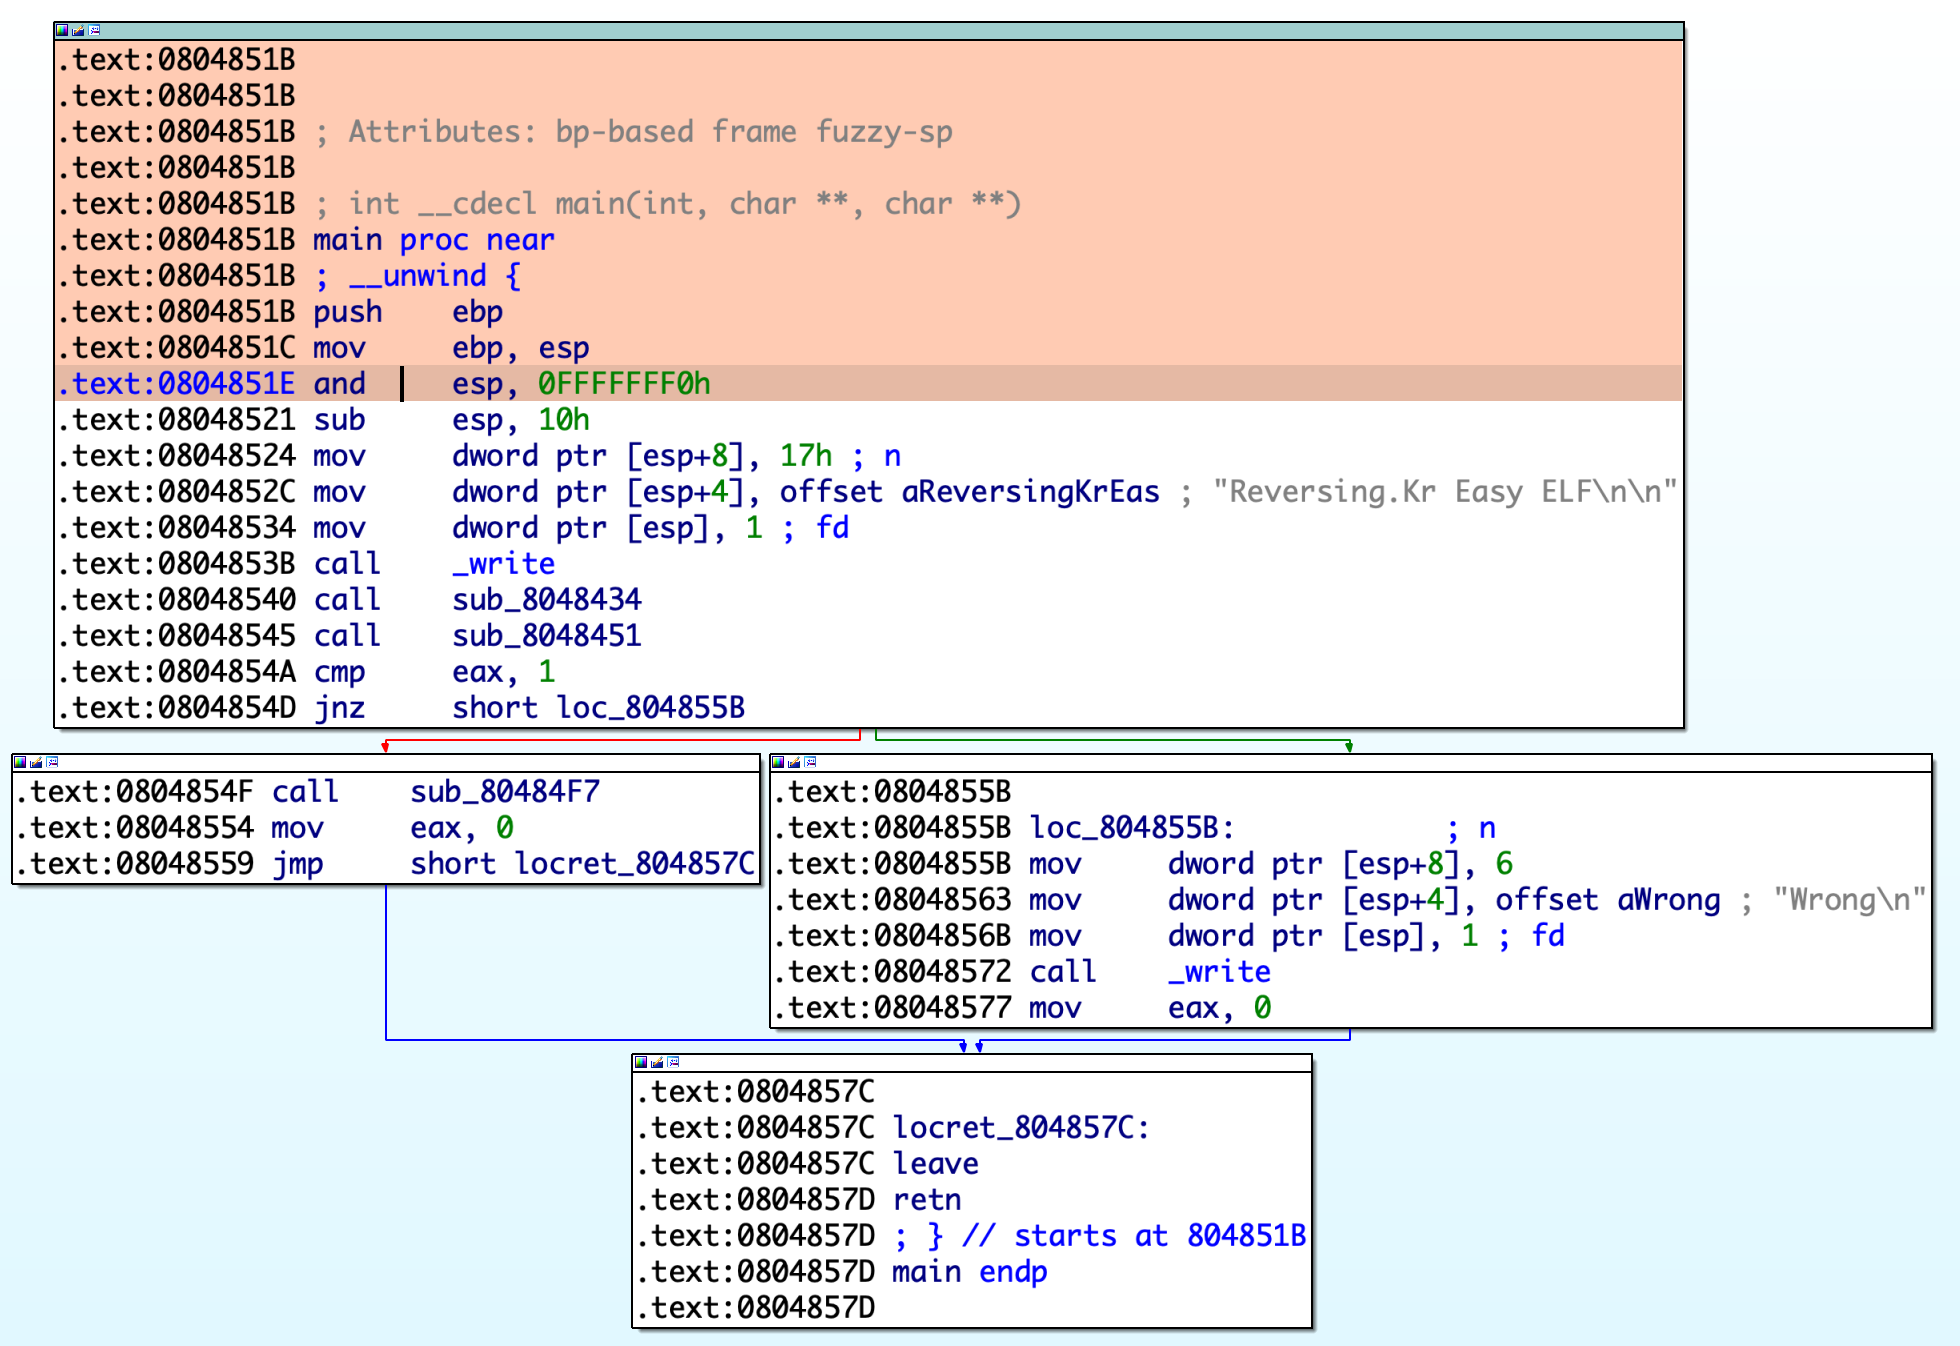
Besides emulating the binary, the Qiling IDA plugin is also capable of debugging the binary in the emulated environment.
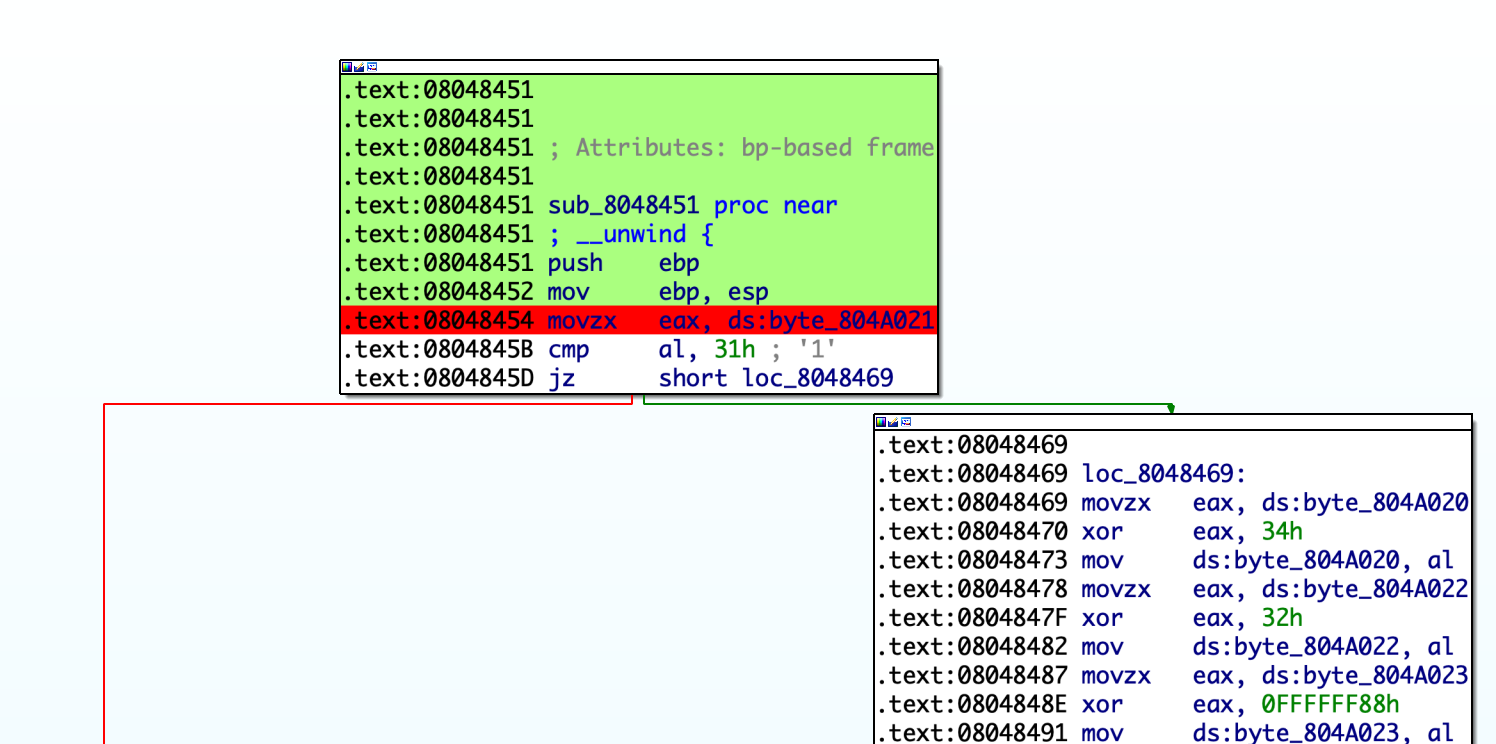
For example, to execute until current position, simply right-click at any address (e.g. 0x804851E for the screenshot below) and select the menu Execute Till. Qiling will stop at your cursor as well as color its path with a different color.
To view registers and stack, select View Register and View Stack in the menu.
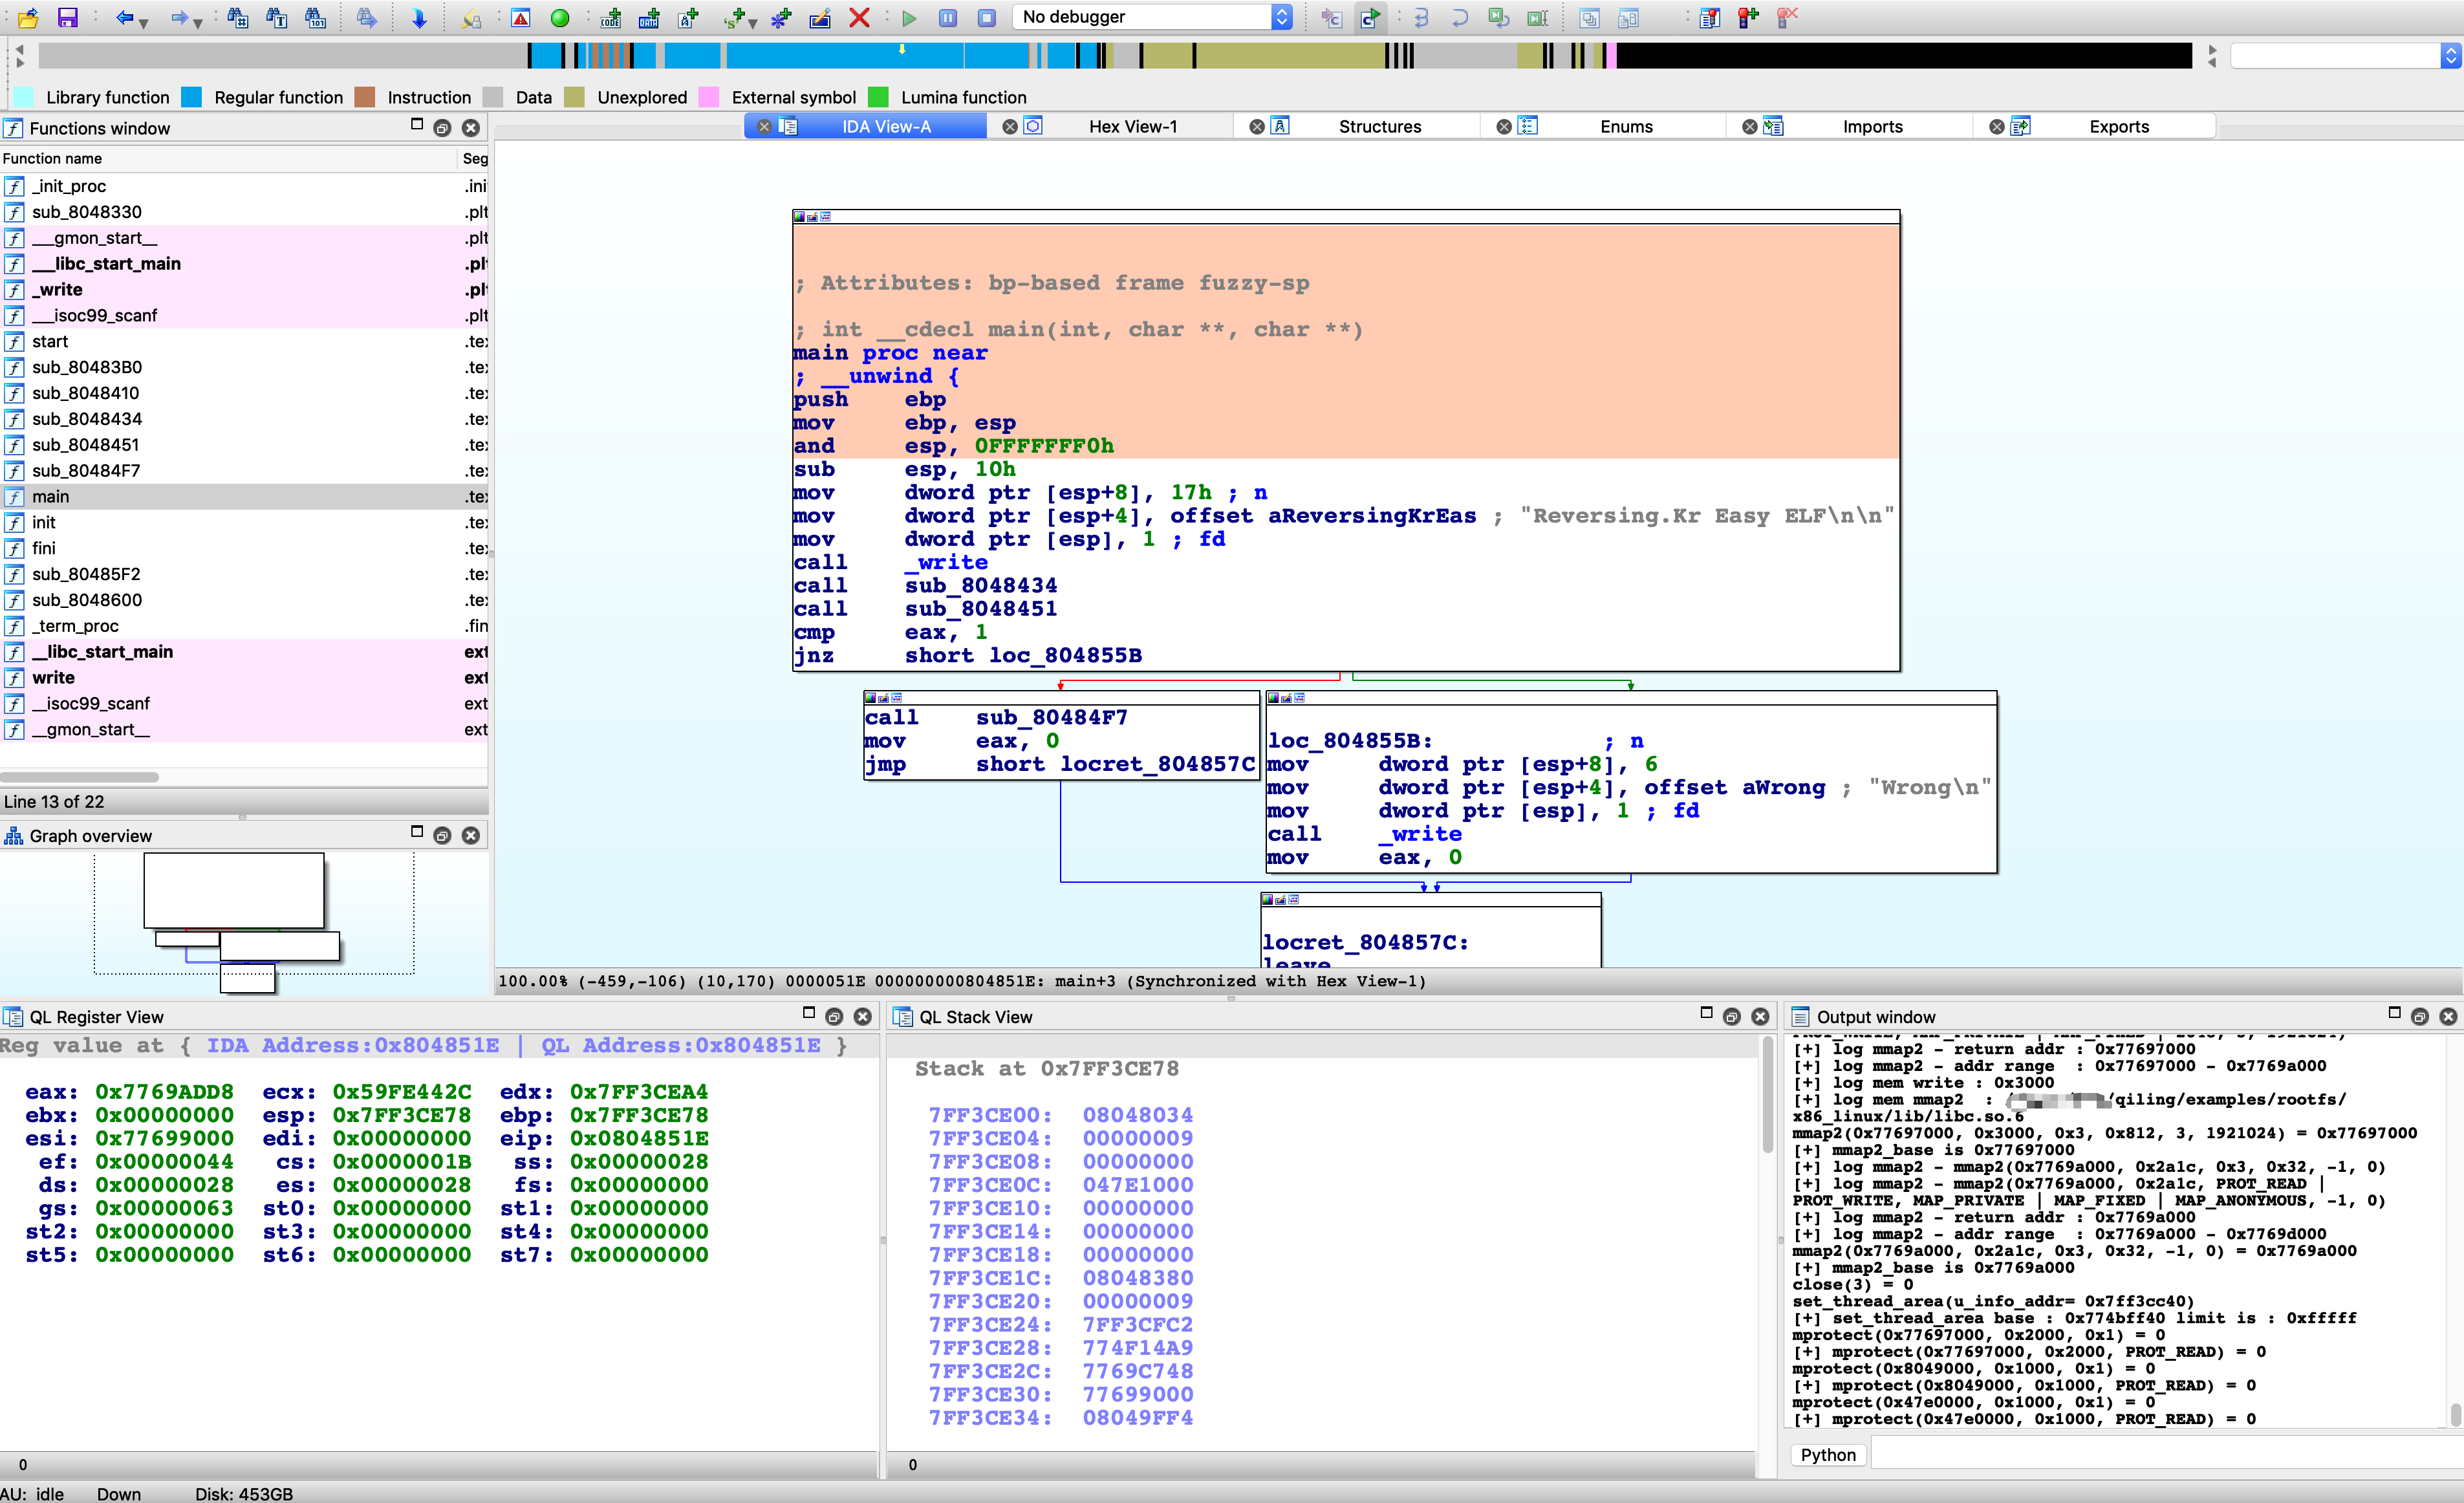
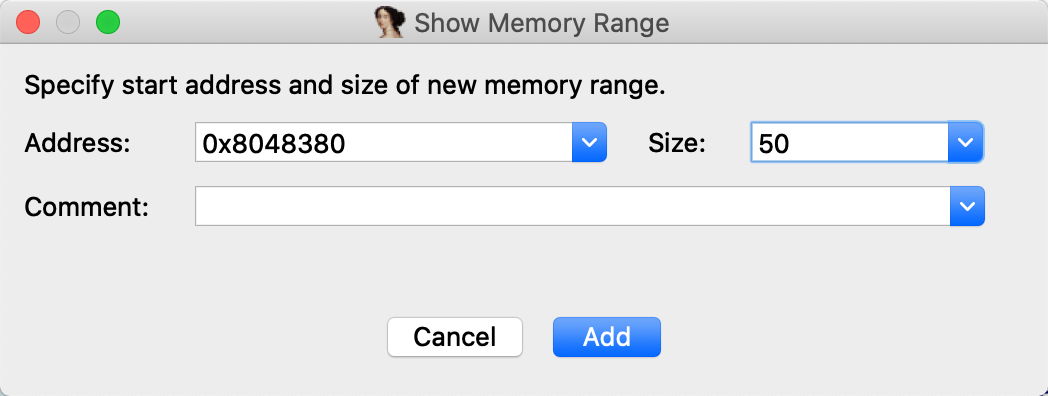
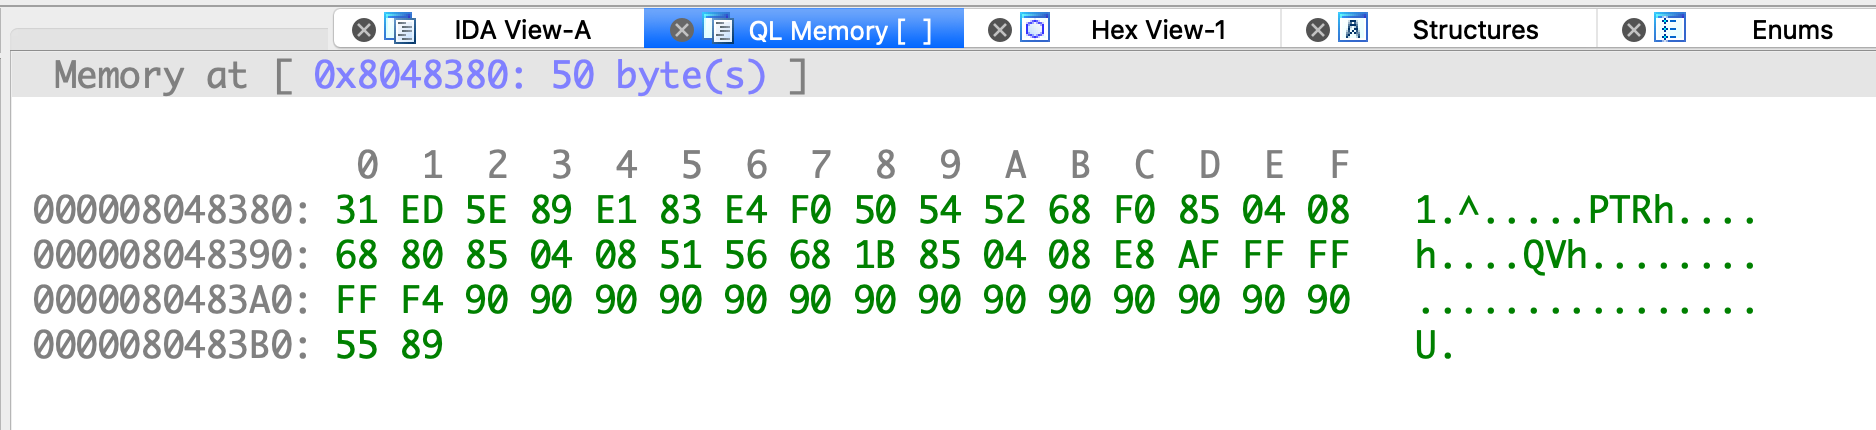
To view Memory, click the menu View Memory and fill in the address and size of memory.
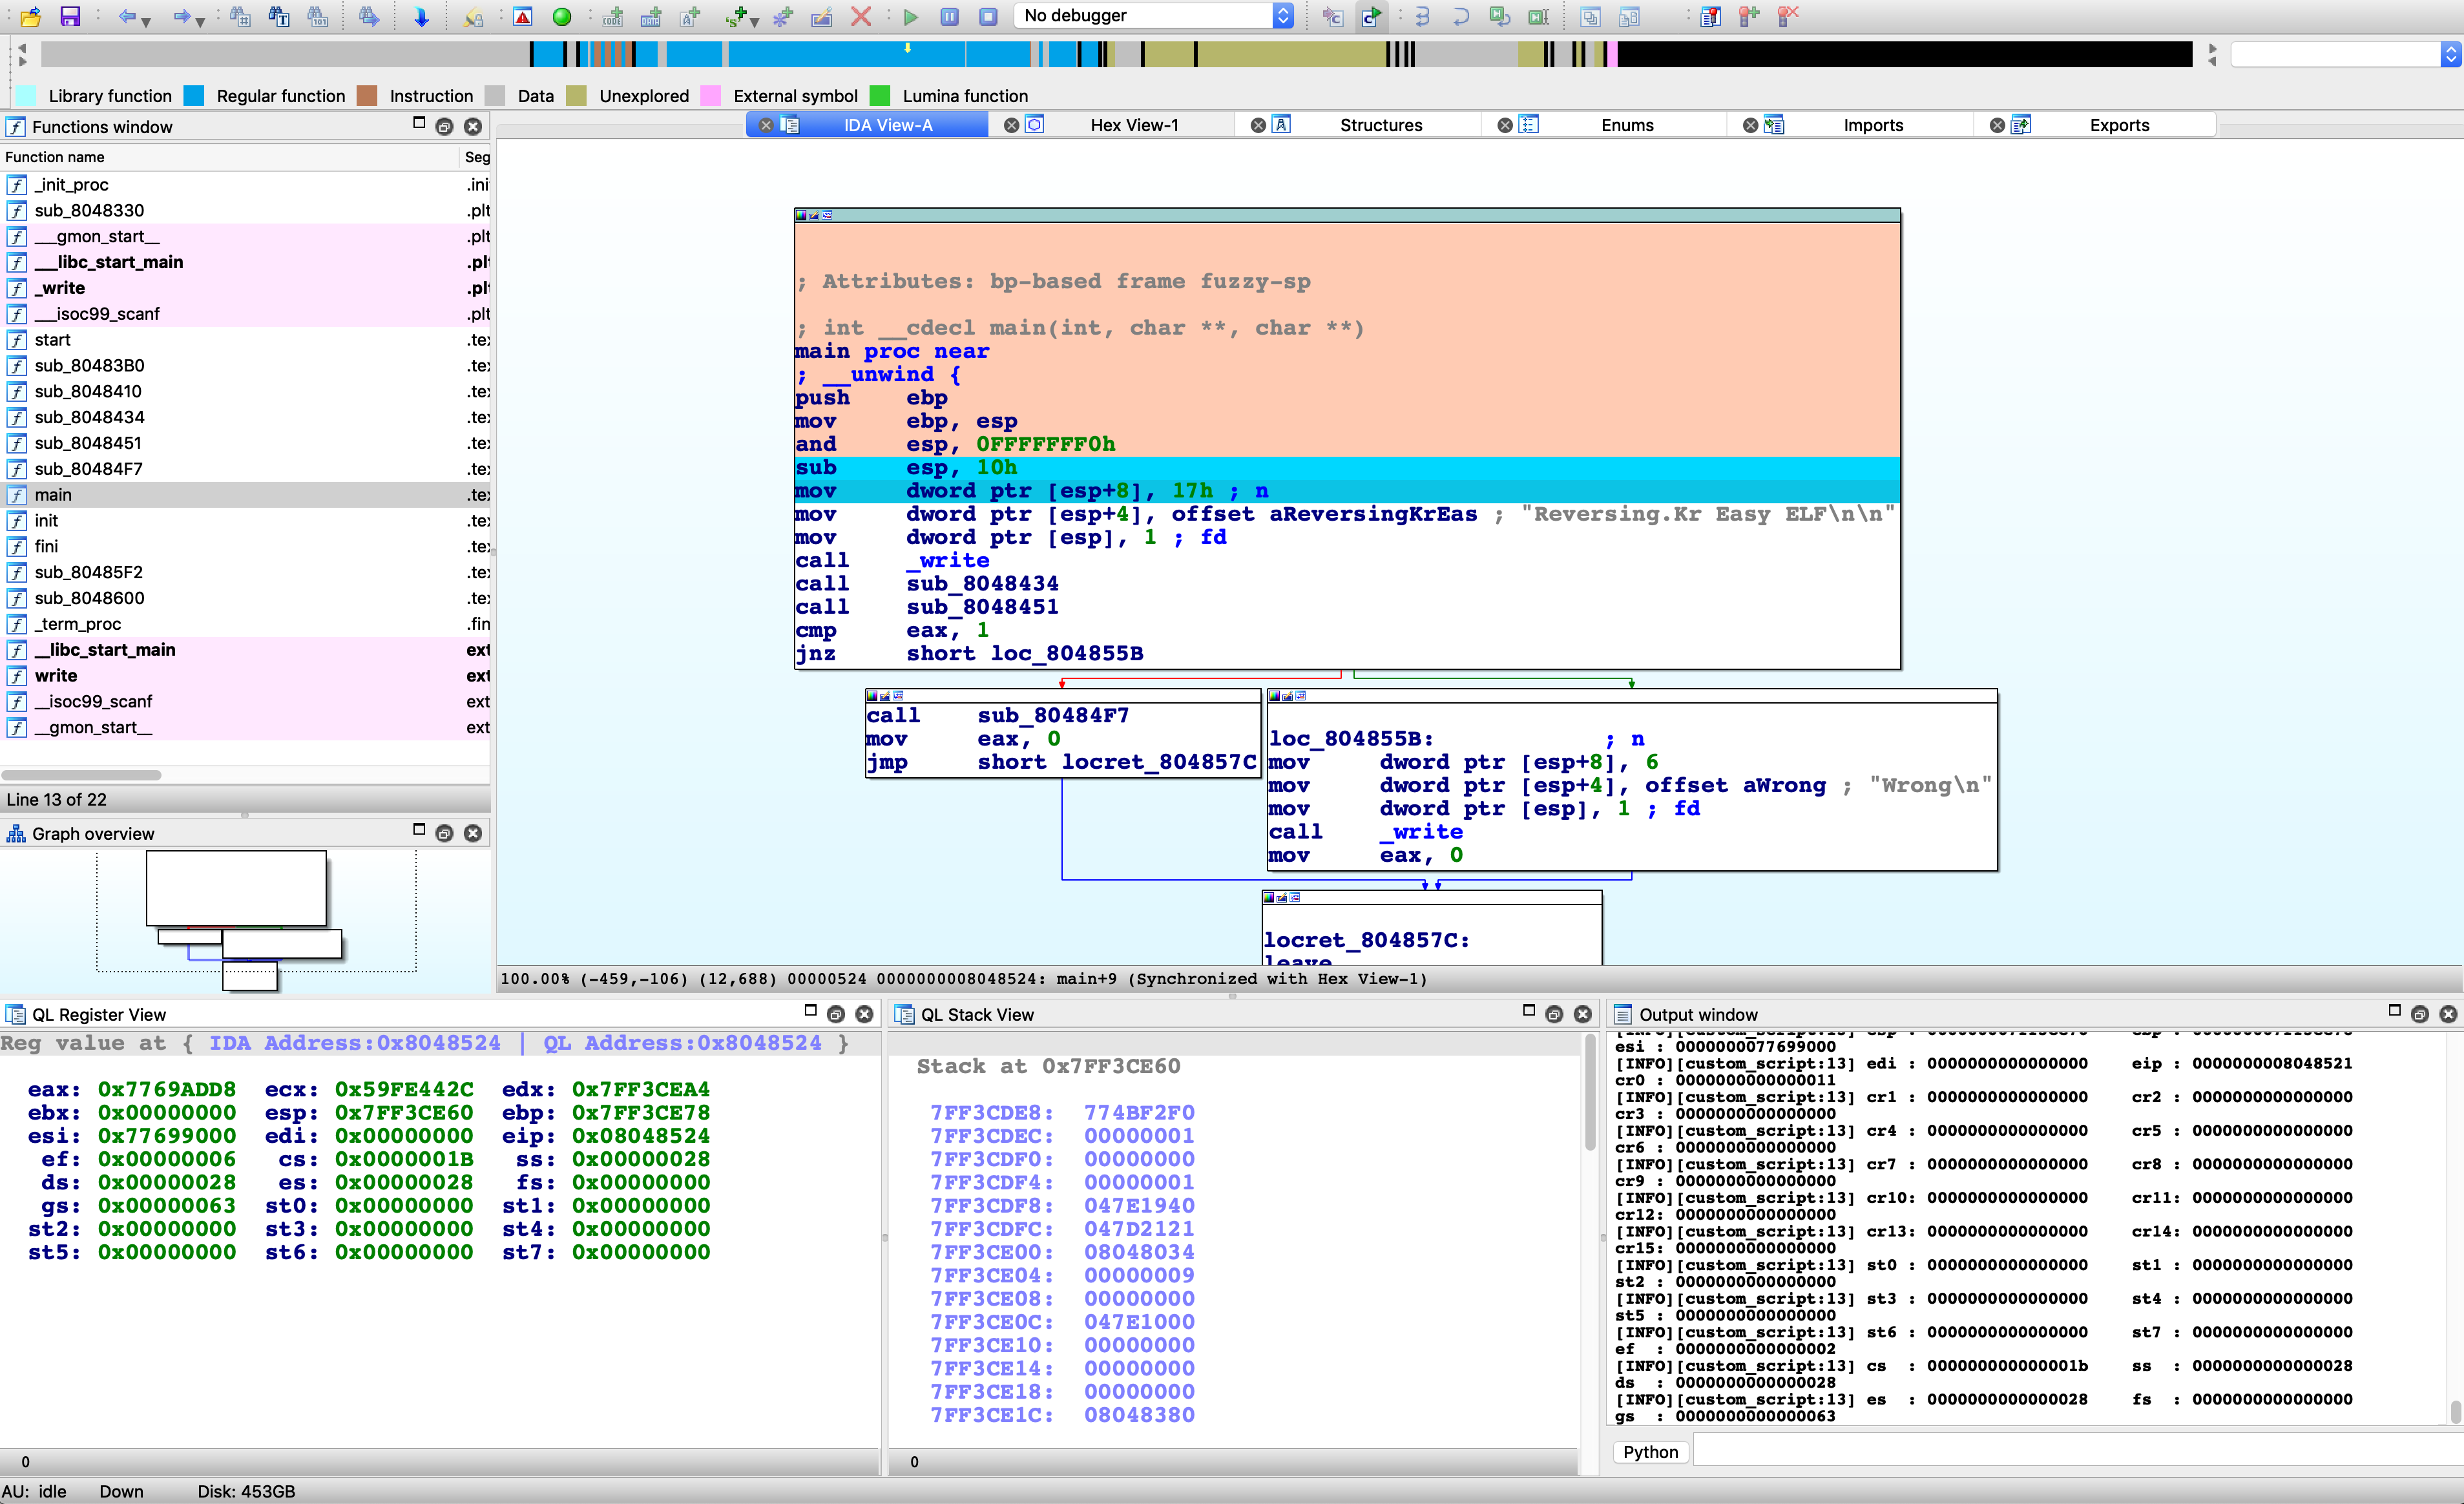
Click the menu Step or press CTRL+SHIFT+F9 to let Qiling step a single instruction. Note the register view and stack view mentioned just now will be updated synchronically.
IDA breakpoints are also supported. Press F2 to set a breakpoint, select menu Continue and Qiling will stop at the breakpoint.
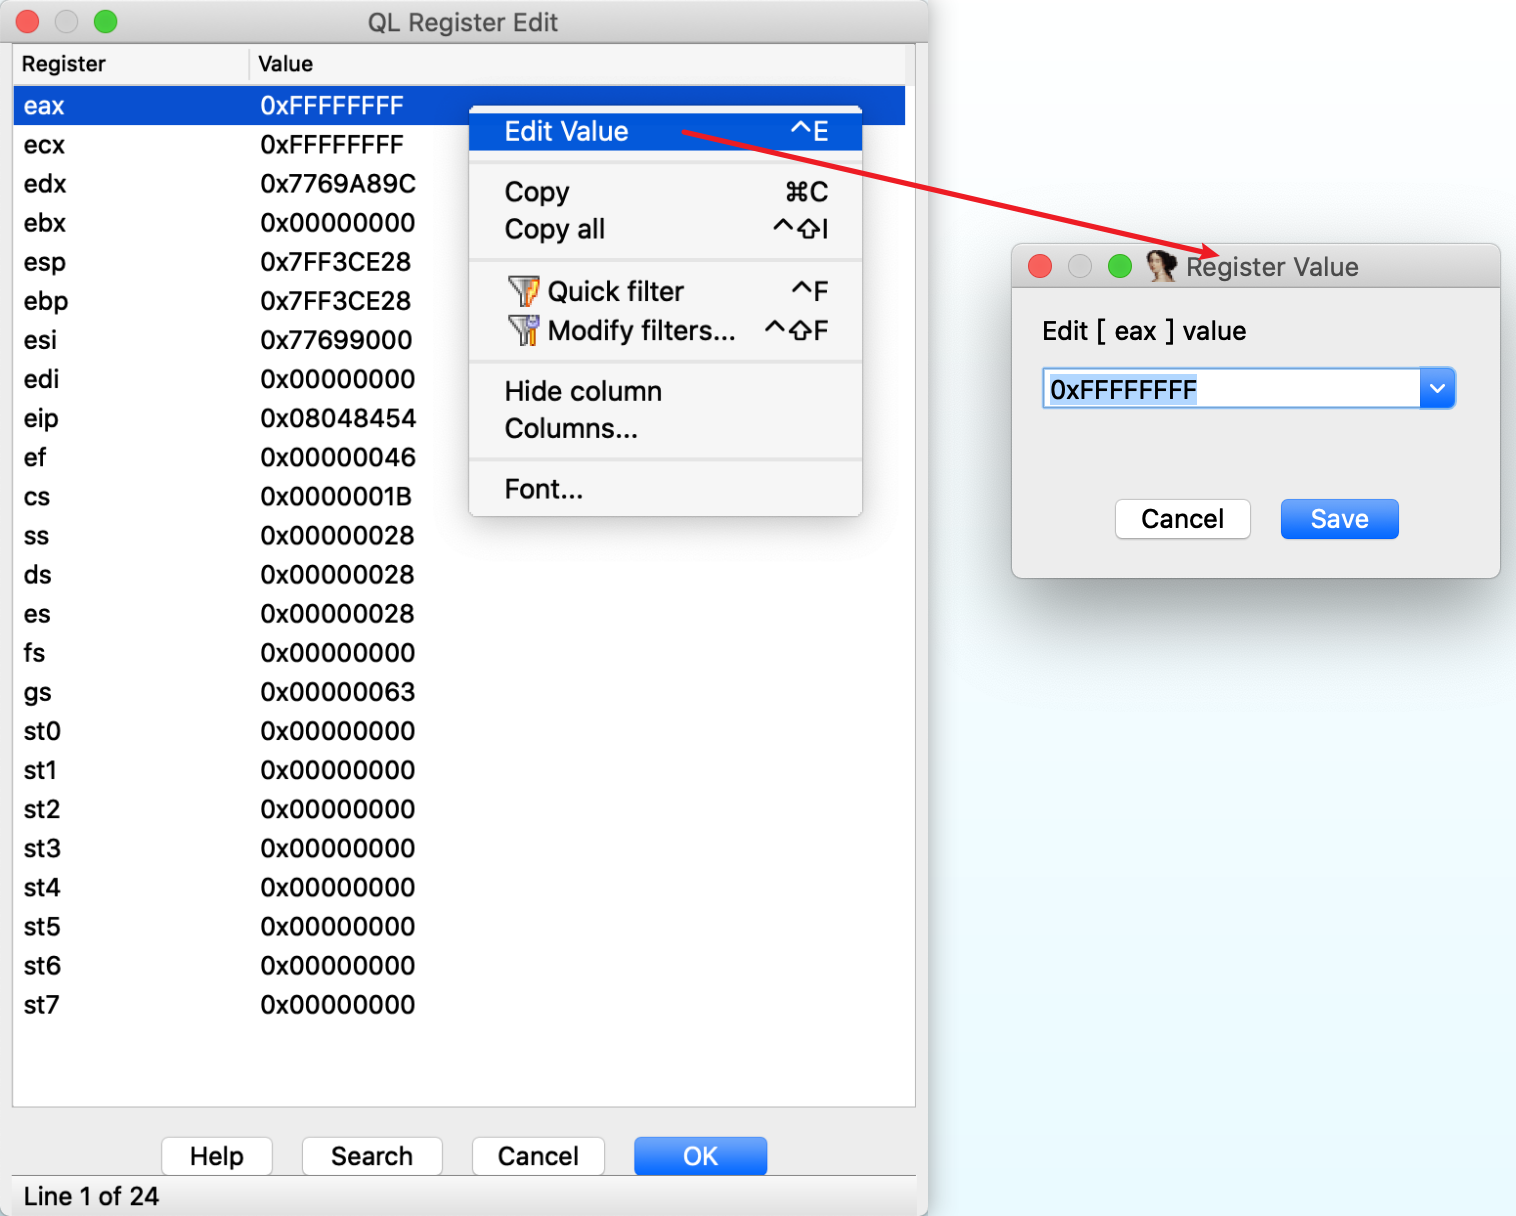
CPU registers can also be edited in the register view window. Right-click on the register, select menu Edit Register and input new value.
Obtain a Reference to Qiling Object
If you would like to handle Qiling object manually in the IDAPython output window, you may type
ql_plugin = ida_ida.ql_plugin
qlemu = ql_plugin.qlemu
ql = qlemu.ql
to get a reference to the inner Qiling object after you setup the plugin previously.
Also, some protips:
# Convert an IDA address to ql internal address
qladdr = qlemu.ql_addr_from_ida(idaaddr)
ql.mem.read(qladdr, 4)
# Convert a ql address to IDA address
qlemu.ida_addr_from_ql_addr(qladdr)
Note
Be cautious with ql_plugin and qlemu. Some functionalities are not designed to called in the output window and you should know what you are doing. However, it's safe to play with ql instance in most cases.
Custom User Scripts
Custom user scripts is for users to implement their own logic when the Qiling IDA plugin emulates, continues or steps.
Below is a minimum custom user scripts without any special functions.
from qiling import *

class QILING_IDA():
    def __init__(self):
        pass

    def custom_prepare(self, ql):
        pass

    def custom_continue(self, ql:Qiling):
        hook = []
        return hook

    def custom_step(self, ql:Qiling):
        hook = []
        return hook
Except for __init__, the three other functions will be called in specific times to allow users to have better control of the execution.
custom_preparewill be called before the plugin callsql.run.custom_continuewill be called when user would like to continue execution.custom_stepwill be called when user steps an instruction.
Below is a slightly complicated example, which logs current context before emulation and every time Qiling continues or steps.
from qiling import *
import logging

class QILING_IDA():
    def __init__(self):
        pass

    # Log all registers to console.
    def _show_context(self, ql:Qiling):
        registers = [ k for k in ql.arch.regs.register_mapping.keys() if type(k) is str ]
        for idx in range(0, len(registers), 3):
            regs = registers[idx:idx+3]
            s = "\t".join(map(lambda v: f"{v:4}: {ql.arch.regs.__getattribute__(v):016x}", regs))
            logging.info(s)

    # Before emulation
    def custom_prepare(self, ql:Qiling):
        logging.info('Context before starting emulation:')
        self._show_context(ql)

    # Continue
    def custom_continue(self, ql:Qiling):
        logging.info('custom_continue hook.')
        self._show_context(ql)
        hook = []
        return hook

    # Step
    def custom_step(self, ql:Qiling):
        def step_hook(ql, addr, size):
            logging.info(f"Executing: {hex(addr)}")
            self._show_context(ql)

        logging.info('custom_step hook')
        hook = []
        hook.append(ql.hook_code(step_hook))
        return hook
Note that the hook list is returned since the plugin will delete user's hooks after each action.
Below is a screenshot when the plugin loads rootfs and custom user script.
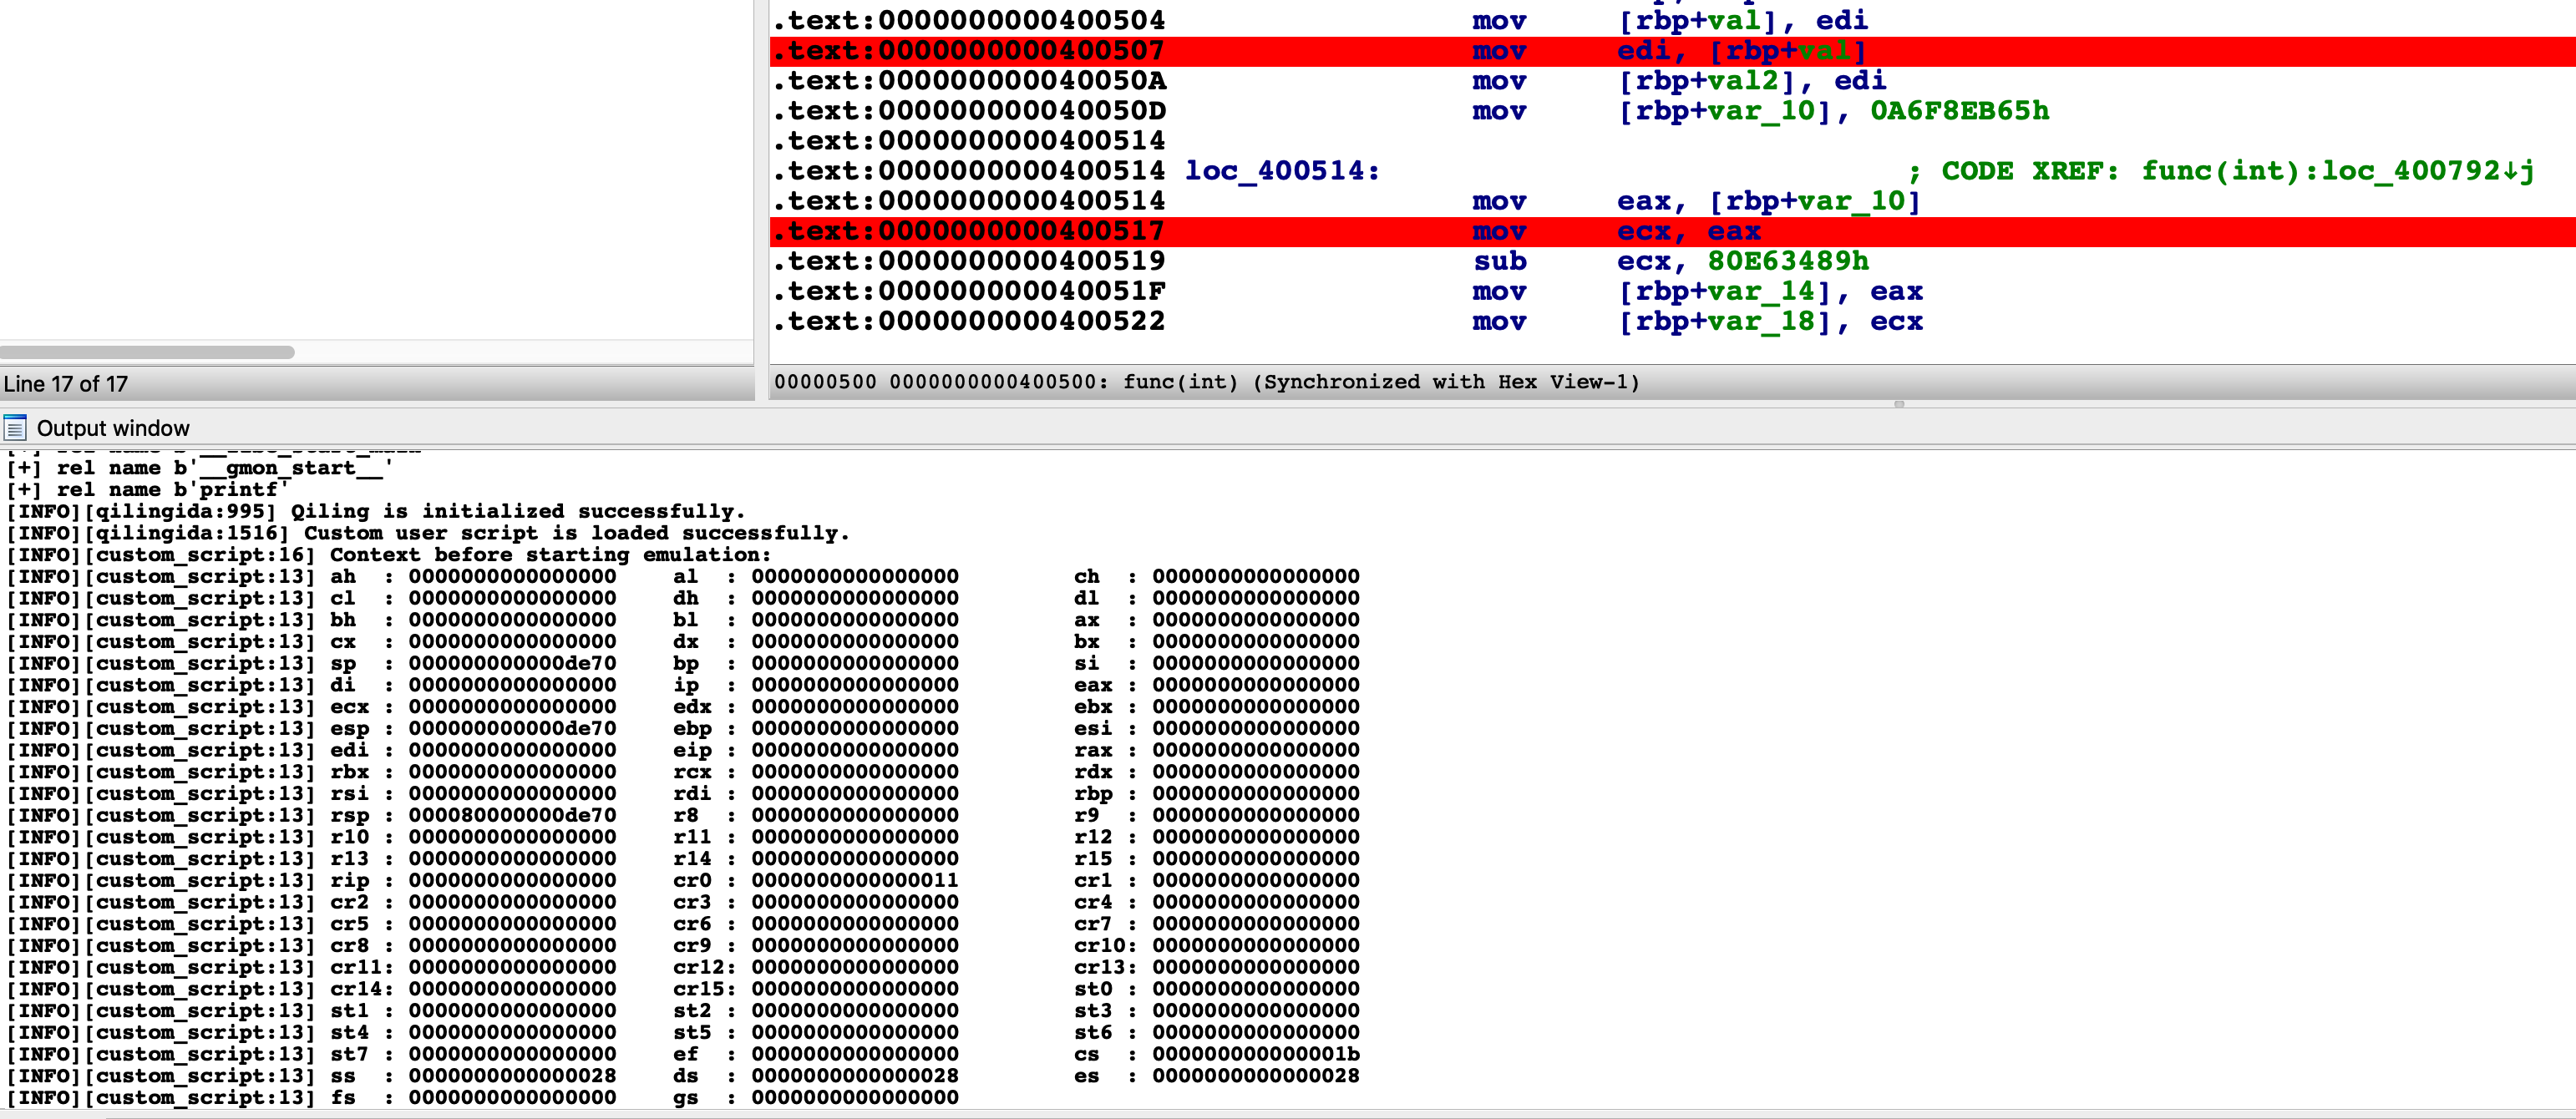
When user choose "Continue", the current CPU context will be logged.

Every time you step an instruction, the output window is updated with the latest CPU context.

The plugin can also reload user scripts dynamically. Edit and save your script, select Reload User Scripts from the menu and all modifications will take effect immediately.
Custom Environment
The env parameter during the setup phase allow to provide a valid json from a chose file, the structure must follow the usual Qiling env dict structure.
Save and Restore Snapshot
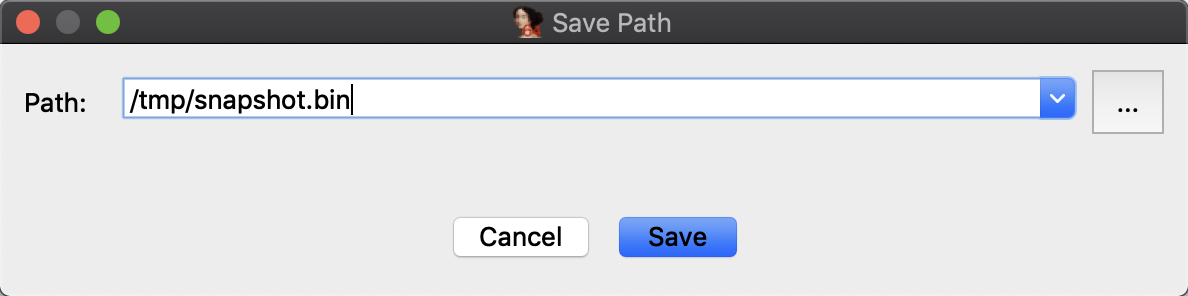
A snapshot is a save of current context, which can be restored anytime in a second. To save a snapshot, select Save Snapshot from the menu and fill in the path.
To restore a snapshot, select Load Snapshot in the menu.
De-obfuscation
Obfuscation is a most common software protection technique to deliberately make the source or machine code hard to understand. Thanks to the IDA powerful CFG API, Qiling IDA plugin can implement multiple de-obfuscation techniques with a mixture of static and dynamic analysis.
Currently, Qiling IDA plugin supports ollvm de-flatten technique.
Ollvm de-flatten
ollvm is a well-known obfuscator. One of its obfuscation technique is Control Flow Flattening. With Qiling IDA plugin, such flattened control flows can be restored easily.
Note
We use Deflat as an abbreviation of De-flatten in docs and plugin.
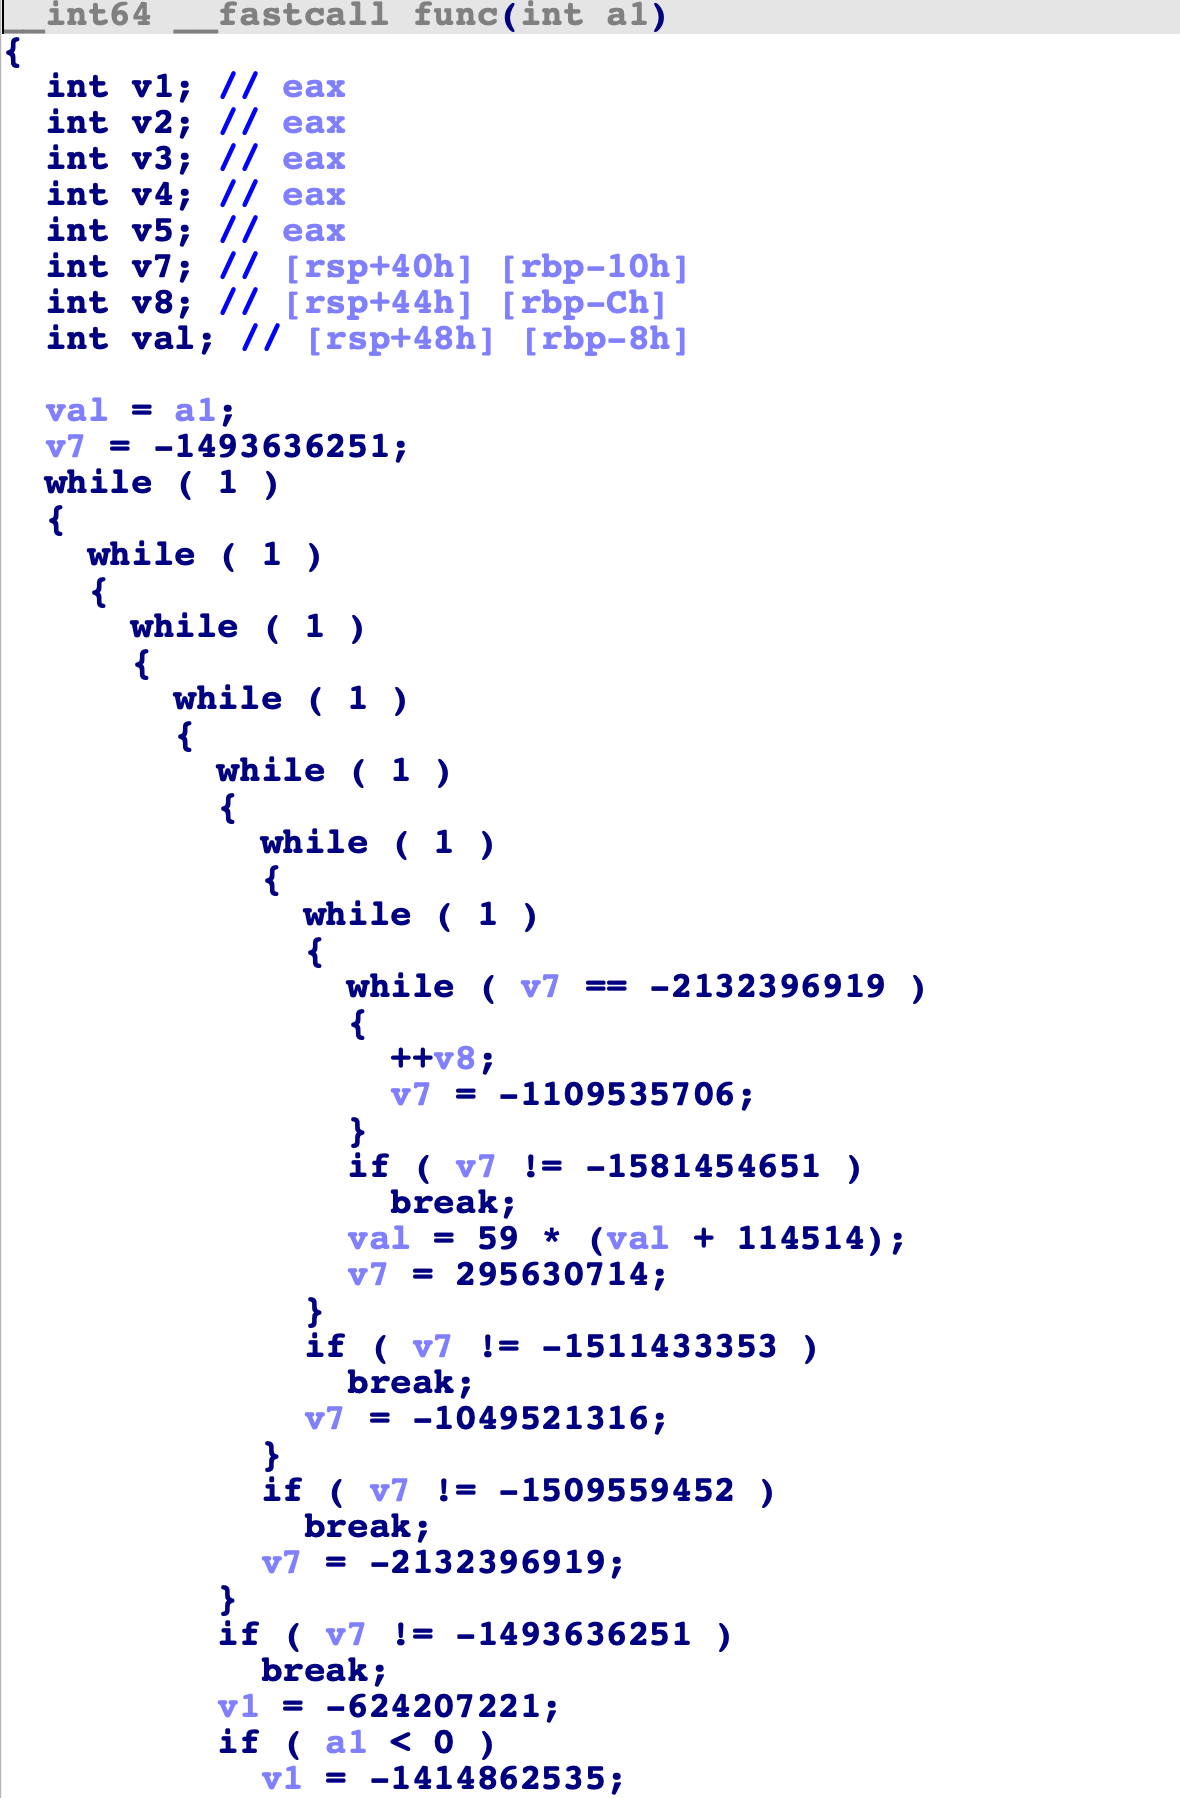
Control Flow Flattening will generate four types of blocks: real blocks, fake blocks, dispatcher blocks and return blocks
- Real blocks: Blocks that contain the real logic in original code.
- Fake blocks: Blocks that contain the fake logic in obfuscated code. They are intended to cooperate with dispatcher blocks to obfuscate original control flows and don't contain any real logic in original code.
- Dispatcher blocks: Blocks that contain
switch...case...case...implementation, decide the following control flows. - Return blocks: Blocks which exit the function.
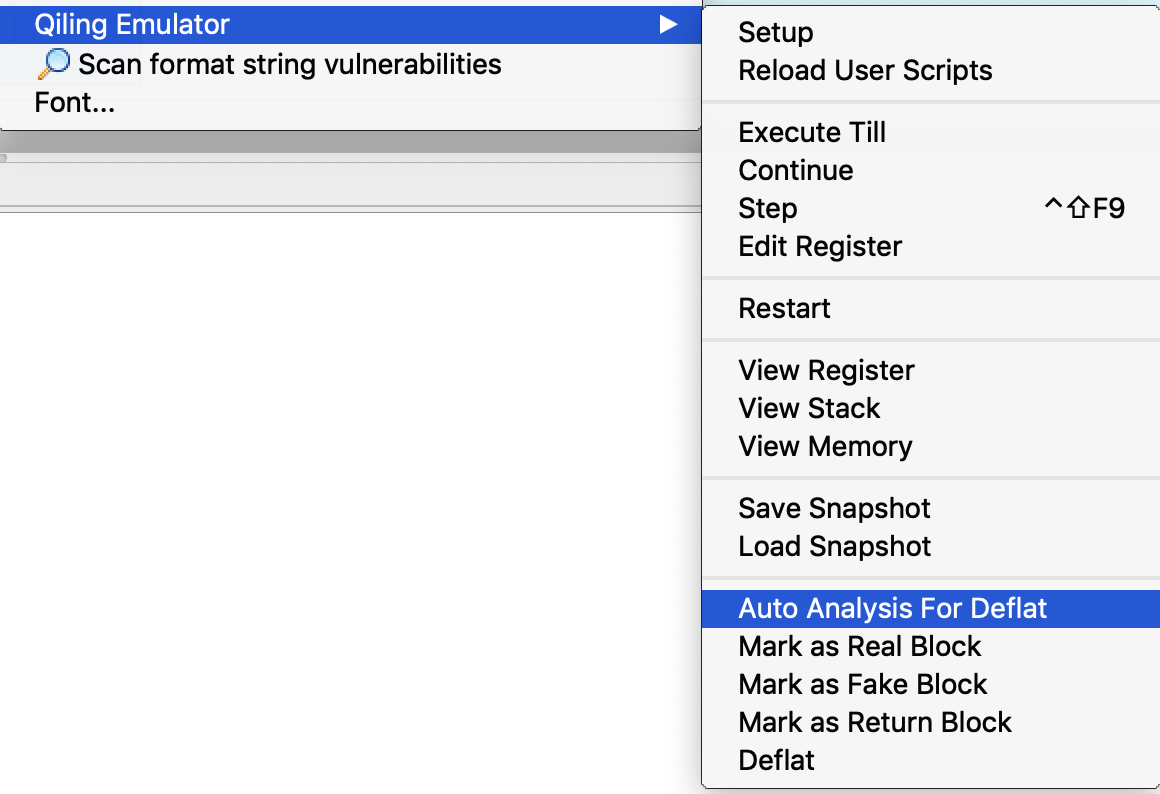
To deflat the function, the first task is to identify such blocks. Qiling IDA plugin will perform some auto analysis by clicking Auto Analysis For Deflat. Note that the basic setup should be done before analysis.
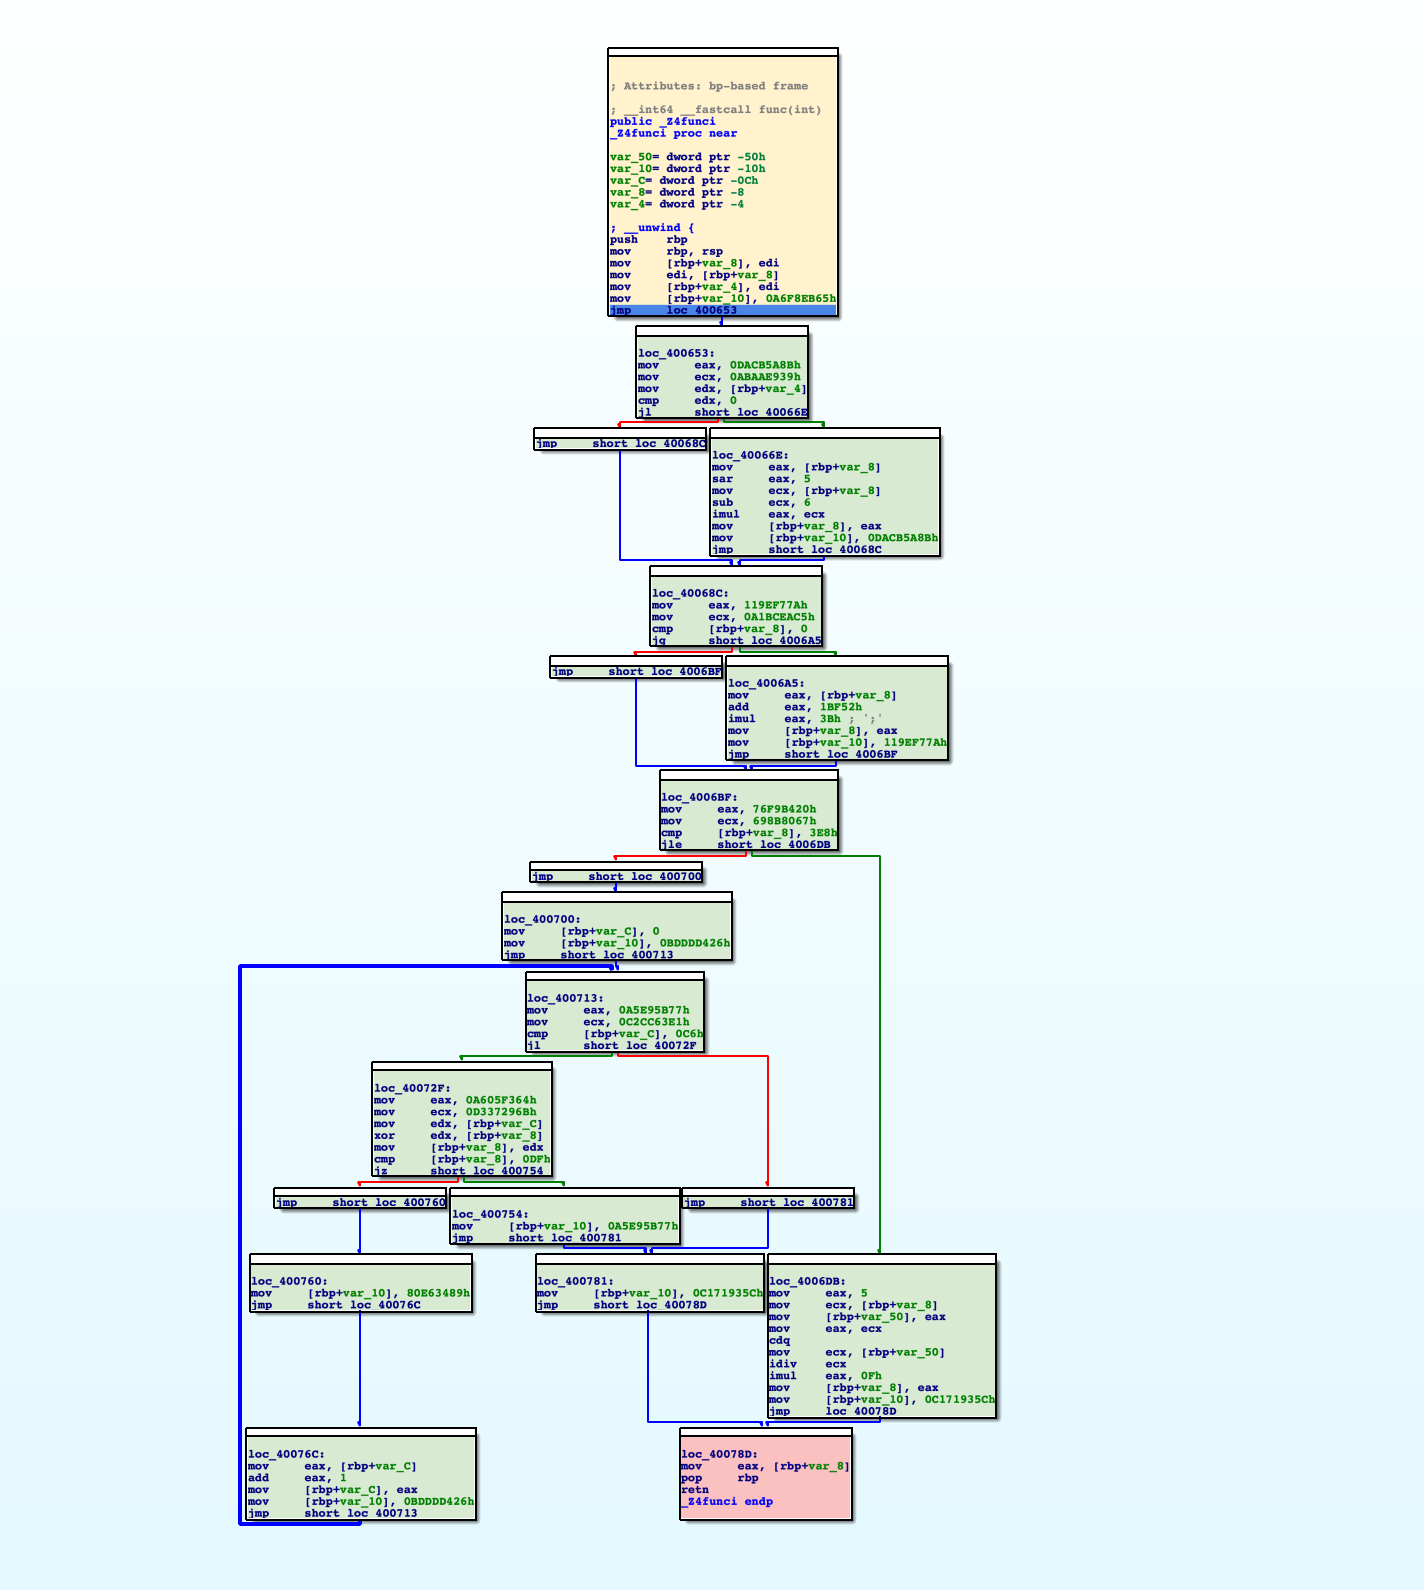
After that, the blocks of the function will be rendered with different colors:
- Green: Real blocks.
- Blue: Dispatcher blocks.
- Gray: Fake blocks.
- Pink: Return blocks.
- Yellow: First block.
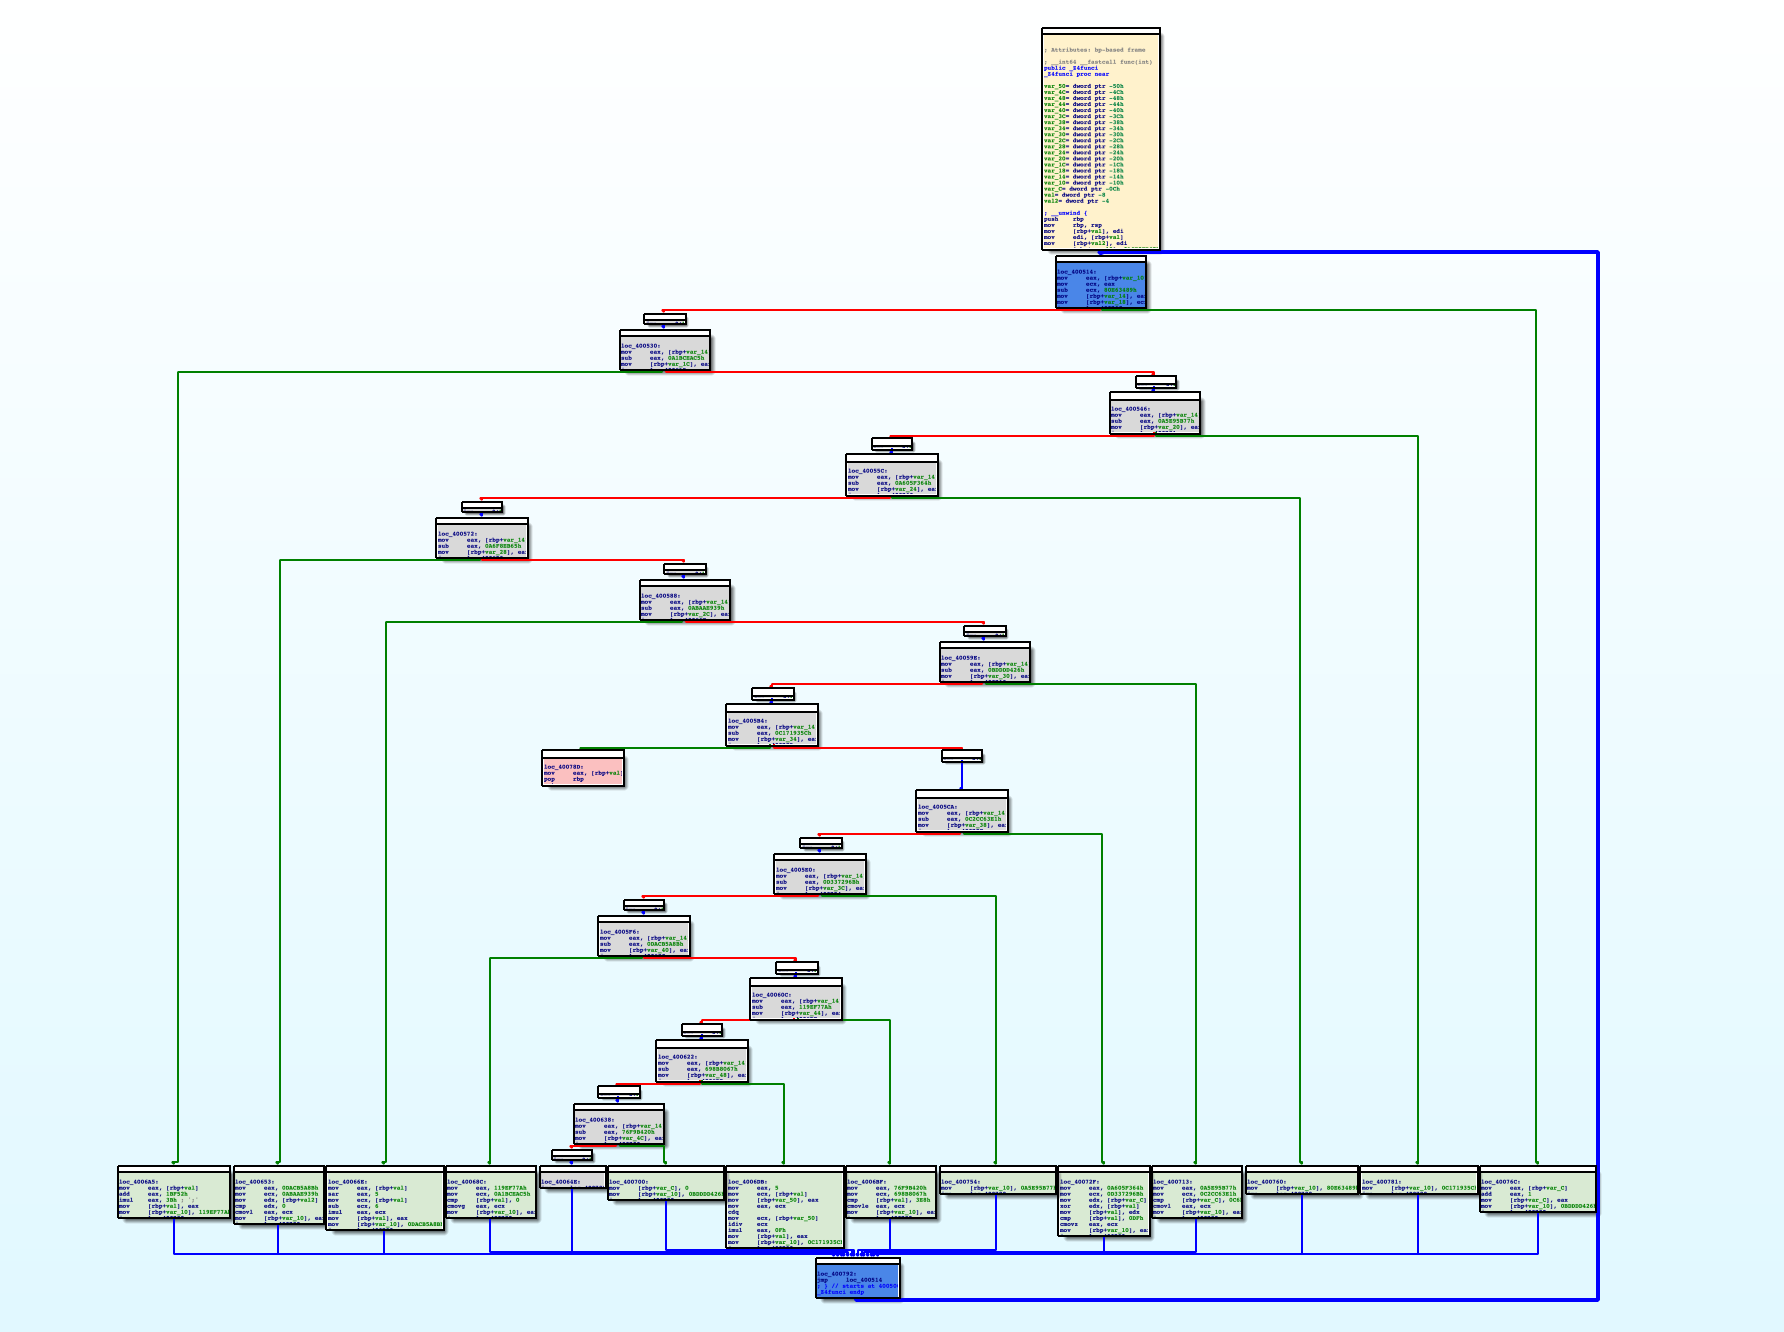
In this stage, user may adjust the analysis result by marking the block as real, fake or return blocks. For example, to mark a block as a real block, click "Mark as Real Block" in the pop-up menu.
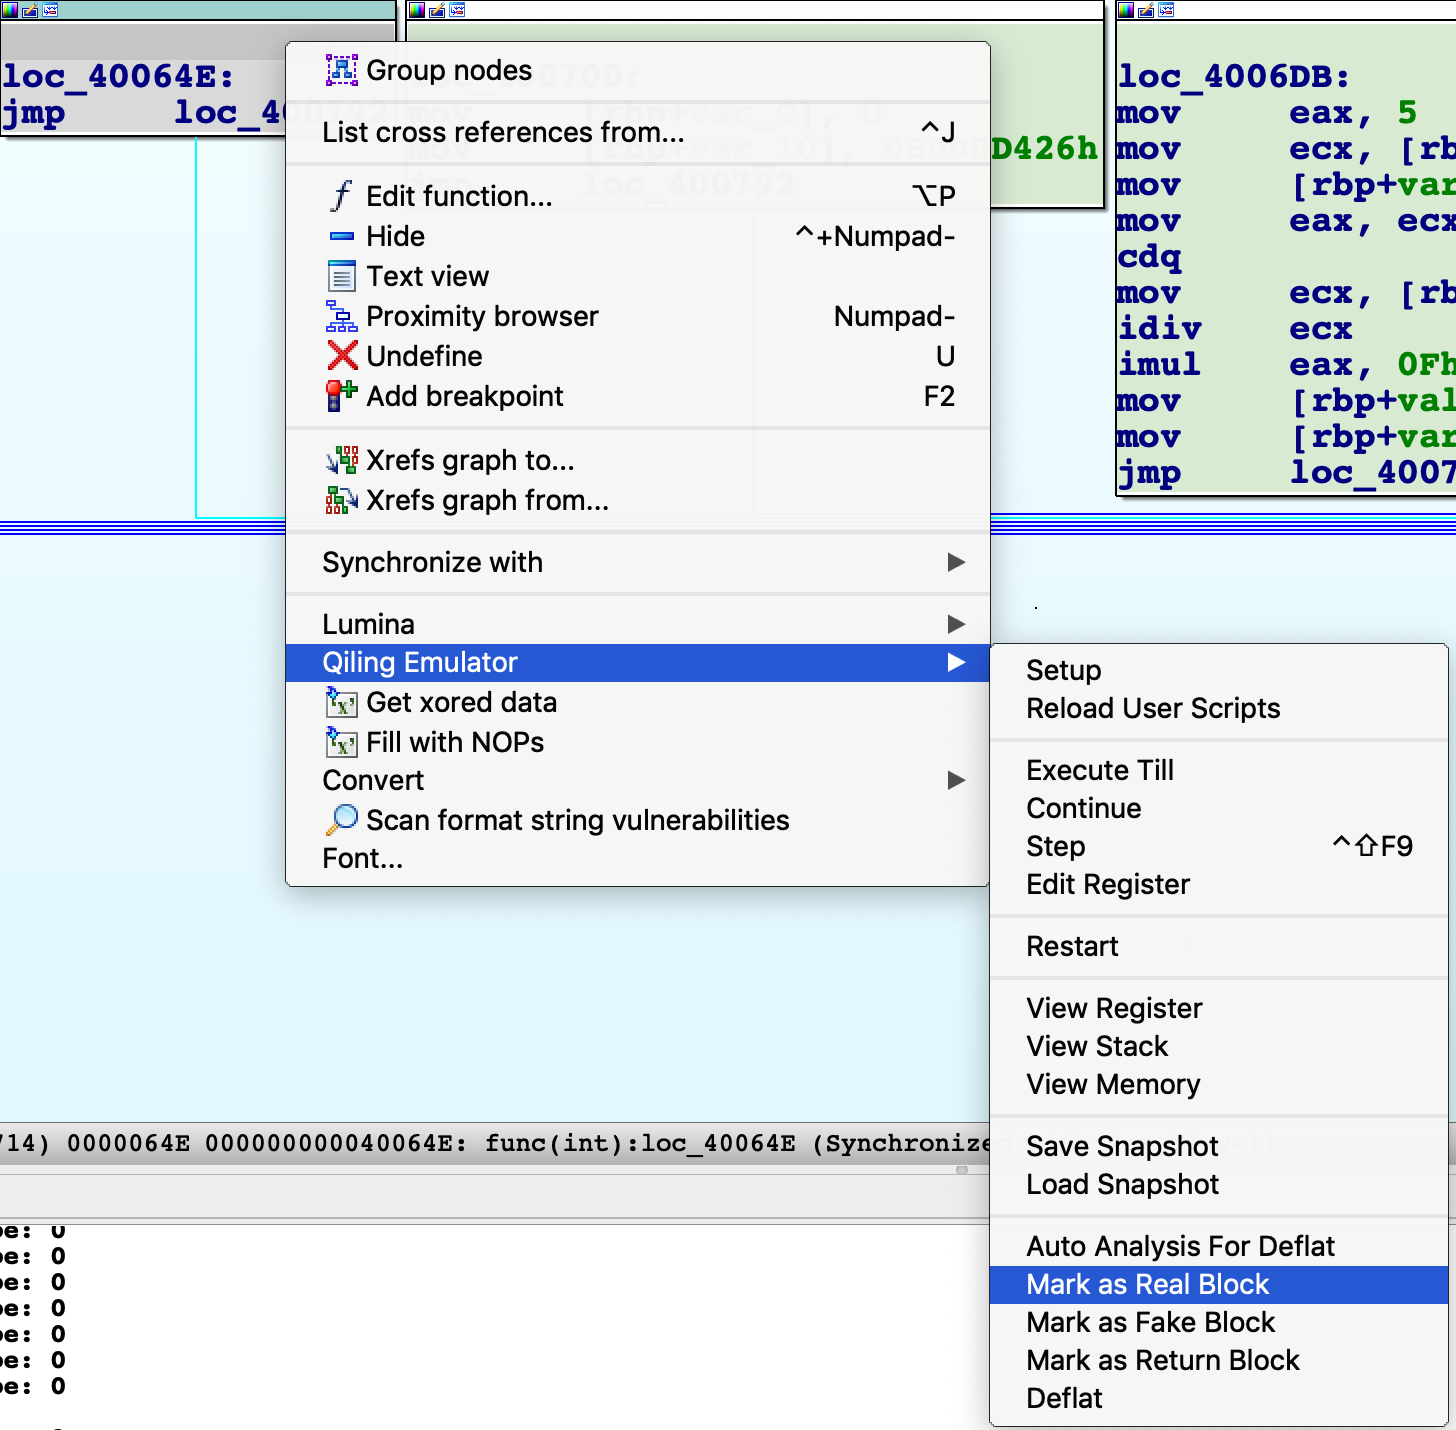
At this stage, the output of IDA decompiler is hard to understand.
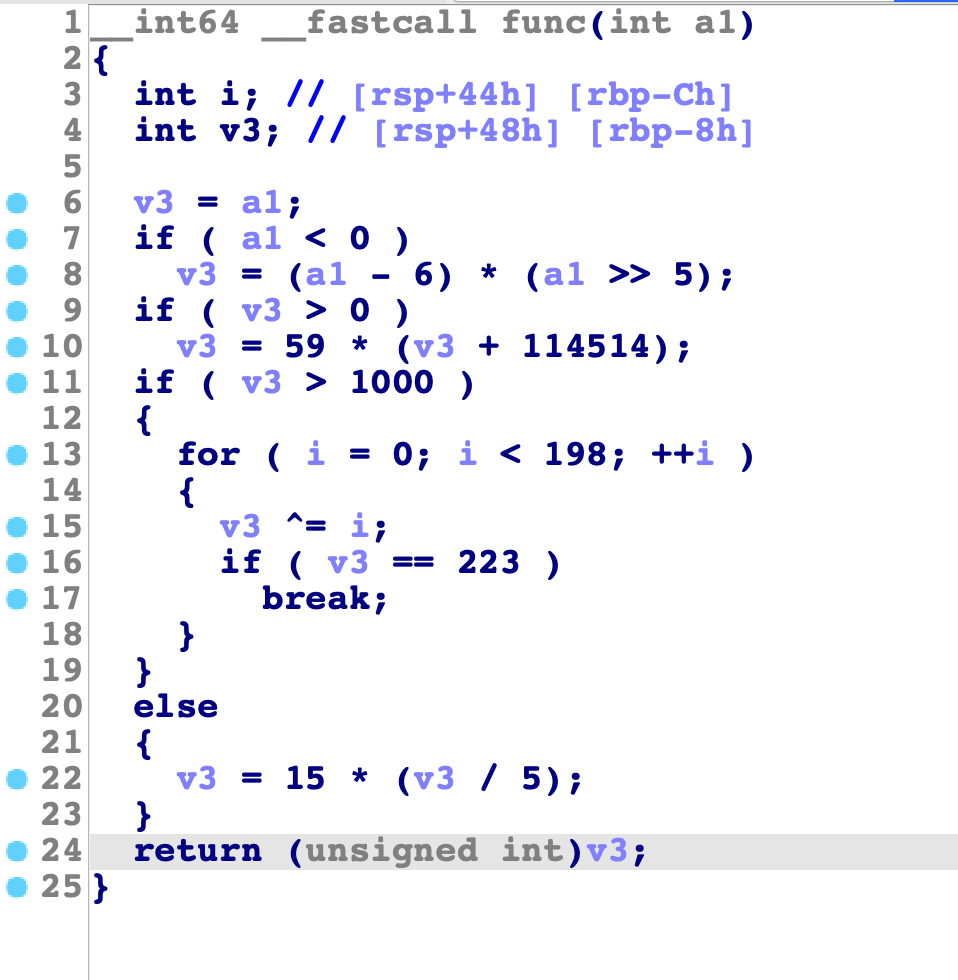
After each block is marked properly, select "Deflat" menu. The plugin will start discovering real control flows between real blocks, then remove all fake blocks and dispatcher blocks. Below is the result:
Pressing F5 now shows the decompiled code without any obfuscation.
References